Beginning Serverless Journey
Background by Nick Fewings on Unsplash
Table of contents
- Building a Serverless application
- Step 1: Setting up the project
- Before we start coding
- Step 2: Let’s start with the lambda handler
- Step 3: Let’s jump into controller
- Step 4: Let’s jump into the service
- Step 5: Let’s jump into the repository
- Step 6: Finishing the Order class
- Step 7: Finishing the OrderRequest class
- Step 8: Introducing async/await in service and controller
- Step 9: Lambda response with API gateway
- Step 10: Adding unit tests
- Controller unit tests
- Summary
- Let’s move on to our next article that explores integration testing using Localstack for our serverless application.
Serverless is a paradigm that lays its foundations on the fact that “We don’t have to provision and manage servers”. This article series explores various aspects involved in a serverless application lifecycle including - development, testing and deployment. Our serverless journey which starts from building to deploying an application will be using multiple serverless components including AWS Lambda, AWS API Gateway, AWS DynamoDB, LocalStack and AWS CDK.
Let us deep dive step by step into what it takes to build a Serverless application.
Building a Serverless application
Let’s assume a hypothetical Order Service that allows creation of an order and its retrieval by order id.
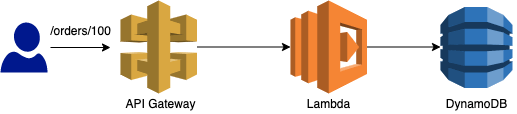
As a part of this article we will be building just one part of this service that will expose a REST API to allow users to find an order by orderId. Below diagram highlights different AWS components involved in finding an order by its id.
We will be using TypeScript for writing our Serverless application. Why Typescript? For a few reasons:
- Short cold start time
- Supports static typing and type inference
- Existing Javascript libraries can be used with Typescript
So, let’s start building our application.
Step 1: Setting up the project
Let’s quickly set up our project:
- Install typescript globally by executing
npm install typescript -g - Create a directory named
serverless-order-servicerepresenting our project - Execute
npm init -yinside our project directory (serverless-order-service) - Add typescript as a dependency by executing
npm install typescript --saveinside our project directory
As a final step, add tsconfig.json with a very simple configuration as mentioned below:
  "compilerOptions": {
    "noEmitOnError": true,
    "moduleResolution": "node",
    "module": "commonjs",
    "target": "es6",
    "outDir": "dist",
    "inlineSourceMap": true
  }
}
That should be it. Our project set up is done, and we are ready to make our first commit.
Before we start coding
Let’s take a moment to think about the overall design of the project.
This application is a classic web application that involves a REST API, a database and an object representing the persistent state of order. With this very small context, I feel it would not be unfair to organise the project in Model-View-Controller fashion that means that execution of a user request will involve the following components:

Step 2: Let’s start with the lambda handler
Lambda handler is a function that will be invoked by the AWS Lambda Service in the response to an event. An event could be - an object uploaded on an S3 bucket, an event on SQS or a https request via API gateway and many more. In our example a request to an API Gateway will be the event.
Before we start our lambda function let’s install the type definition for aws-lambda by executing: npm install @types/aws-lambda --save-dev and create a commit.
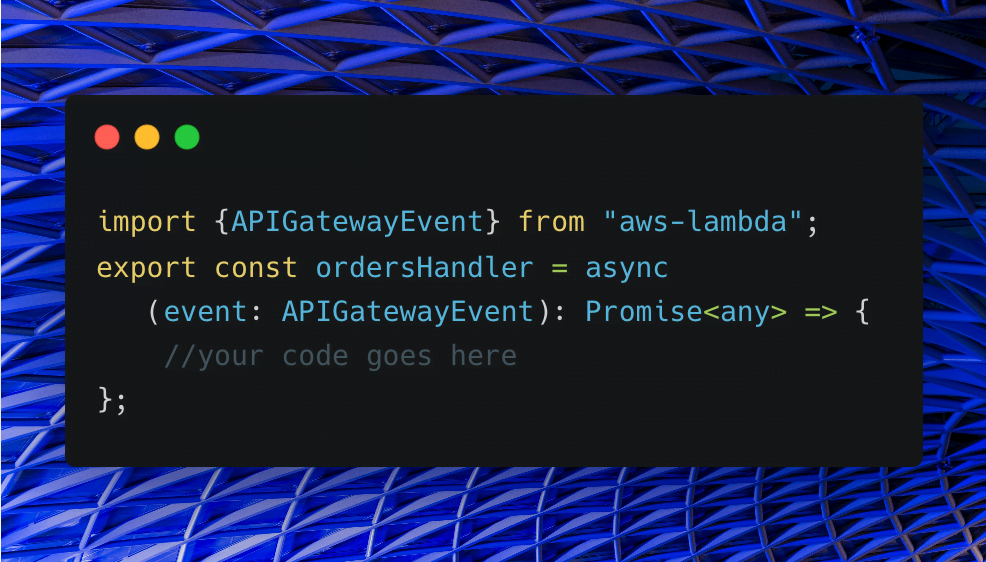
After the dependency is installed we are ready to code our handler. Let’s put this in a file named handler.ts under the src directory.
import {APIGatewayEvent} from "aws-lambda";
export const ordersHandler = async (event: APIGatewayEvent): Promise<any> => {
    //your code goes here
};
This is the simplest handler function that could be created at this stage. One thing to note is we are using the type APIGatewayEvent imported from “aws-lambda” to get type-safe events as parameter to handler function.
We want to keep our handler function as thin as possible, so we will delegate the request to a controller class which instead of taking APIGatewayEvent will take a domain object that wraps the APIGatewayEvent.
In this example, OrderRequest is that domain object, effectively a wrapper over APIGatewayEvent.
import {APIGatewayEvent} from "aws-lambda";

export const ordersHandler = async (event: APIGatewayEvent): Promise<any> => {
    return new OrderController().handle(new OrderRequest(event)); //handler invokes controller
};

export class OrderController {
    handle(orderRequest: OrderRequest) {
        //accepts OrderRequest
    }
}

//domain object that wraps APIGatewayEvent
export class OrderRequest {
    constructor(private readonly event: APIGatewayEvent) {
    }
}
Let’s move the OrderController and the OrderRequest classes to controller and model packages (or directories) respectively and invoke the OrderController from handler. This is how the handler function will look like after the classes have been moved.
import {APIGatewayEvent} from "aws-lambda";
import {OrderRequest}    from "./model/OrderRequest";
import {OrderController} from "./controller/OrderController";

export const ordersHandler = async (event: APIGatewayEvent): Promise<any> => {
    return new OrderController().handle(new OrderRequest(event));
};
I think we are ready to make our next commit. I know we haven’t written any unit tests but as far as this article is concerned, we will write unit tests before we start the next article.
Step 3: Let’s jump into controller
Controller is a class that will handle the incoming request and return an appropriate response. By this definition, controller will be expected to accept an OrderRequest and find an order by its id.
import {OrderRequest} from "../model/OrderRequest";

export class OrderController {

    handle(orderRequest: OrderRequest) {
       if (orderRequest.isAGetOrder()) { //if the request is for finding an order
         return this.findAnOrderBy(orderRequest.orderId()); //find an order by its id
       }
       return null;
    }

    private findAnOrderBy(id: string): Order {
        return null; //fake implementation
    }
}

export class Order {
}
Few quick observations:
OrderRequestis the domain object that encapsulates theAPIGatewayEventand provides domain methods likeorderId(),isAGetOrder()without exposing theAPIGatewayEvent.- Currently,
orderId()andisAGetOrder()methods of theOrderRequestreturn fixed (or fake) values.
Let’s make a few quick changes in the OrderController:
- Move the
Orderclass in themodelpackage - Invoke the service method to find an order by its id
This is how different classes look at this stage.
//OrderController.ts
import {OrderRequest} from "../model/OrderRequest";
import {Order}        from "../model/Order";
import {OrderService} from "../service/OrderService";

export class OrderController {
    private orderService: OrderService;

    constructor() {
        this.orderService = new OrderService();
    }

    handle(orderRequest: OrderRequest) {
       if (orderRequest.isAGetOrder()) {
         return this.findAnOrderBy(orderRequest.orderId())
       }
       return null;
    }

    private findAnOrderBy(id: string): Order {
        return this.orderService.findAnOrderBy(id); //controller invokes service to find an order by its id
    }
}

//OrderRequest.ts
import {APIGatewayEvent} from "aws-lambda";

export class OrderRequest {
    constructor(private readonly event: APIGatewayEvent) {
    }
    isAGetOrder(): boolean {
       return true; //fake implementation
    }
    orderId(): string {
        return ""; //fake implementation
    }
}

//OrderService.ts
export class OrderService {

    findAnOrderBy(id: string) {
        return null; //fake implementation
    }
}
Step 4: Let’s jump into the service
The service layer will interact with the repository to find an order by id. It doesn’t look like service layer is really needed for this example, but let’s proceed with it.
export class OrderService {
    private repository: OrderRepository;

    constructor() {
        this.repository = new OrderRepository();
    }
    findAnOrderBy(id: string) {
        return this.repository.findAnOrderBy(id); //service invokes repository to find an order by its id
    }
}

export class OrderRepository {
    findAnOrderBy(id: string) {
        return null; //fake implementation
    }
}
Let’s move OrderRepository into repository package.
Step 5: Let’s jump into the repository
The repository will interact with our database which in this example is a DynamoDB and fetch an order by its id. Let’s assume a table named orders with orderId as the HASH key and an attribute named amount.
We will be using aws-sdk for querying DynamoDB. aws-sdk is a dependency that is available in the runtime environment of lambda which means this dependency can be added as a devDependency.
So, let’s add it as a devDependency by executing npm install aws-sdk --save-dev. Let’s also add the type definitions for aws-sdk by executing npm install @types/aws-sdk --save-dev.
Now we are ready to query the orders table.
import {DynamoDB} from "aws-sdk"
import {GetItemInput} from "aws-sdk/clients/dynamodb";
import {Order} from "../model/Order";

const dynamoDb = new DynamoDB({
    "region": "ap-south-1"
});

export class OrderRepository {

    async findAnOrderBy(id: string) {
        const getItemInputOptions: GetItemInput = {
            TableName: "orders", //table name
            Key: {
                "orderId": {S: id} //query against orderId attribute of order item
            }
        };
        const response = await dynamoDb.getItem(getItemInputOptions).promise(); //get a dynamo item by passing its id
        return response.Item;
    }
}
Few quick observations:
- We have hard-coded the region and table name, which we might want to fetch from configuration/properties for the below-mentioned reasons:
- region might be different for actual environment and integration testing (using localstack)
- if there are multiple deployment environments and dynamo table name is different for each environment
- With DynamoDB the lowest level of abstraction is a table, hence, we might need different table name for each environment
- Method name and return type of the method do not go hand-in-hand. We expect this method to return an order but this method seems to be returning some type specified by
response.Item
Let’s quickly make a change to return the Order instead of response.Item.
import {DynamoDB} from "aws-sdk"
import {GetItemInput} from "aws-sdk/clients/dynamodb";
import {Order} from "../model/Order";

const dynamoDb = new DynamoDB({
    "region": "ap-south-1"
});

export class OrderRepository {

    async findAnOrderBy(id: string) {
        const getItemInputOptions: GetItemInput = {
            TableName: "orders", //table name
            Key: {
                "orderId": {S: id} //query against orderId attribute of order item
            }
        };
        const response = await dynamoDb.getItem(getItemInputOptions).promise(); //get a dynamo item by passing its id
        return response.Item ? Order.from(response.Item) : null;  //map dynamo item to Order
    }
}
and this is how the Order.ts looks like:
import {DocumentClient} from "aws-sdk/clients/dynamodb";

export class Order {
    static from(item: DocumentClient.AttributeMap): Order {
        return null; //fake implementation
    }
}
This completes the implementation of our repository. We still have some open items. Let’s take them one by one:
- Pending implementation of the
from()method in theOrder - Pending implementation of the
orderId()in theOrderRequest - Pending changes relating to
async/awaitin the controller, service and the handler
Step 6: Finishing the Order class
The order class provides a static method which accepts and instance of DocumentClient.AttributeMap and returns an instance of Order consisting of orderId and amount.
import {DocumentClient} from "aws-sdk/clients/dynamodb";

export class Order {

    static from(item: DocumentClient.AttributeMap): Order {
        return new Order(item.orderId.S, Number(item.amount.N)); //create an instance of Order from an instance of AttributeMap
    }
    private constructor(private readonly orderId: string,
                        private readonly amount: number) {
    }
}
AttributeMap within aws-sdk is defined as:
export type AttributeMap = {[key: string]: AttributeValue};and AttributeValue is an interface which is defined as:
export interface AttributeValue {
    S?: StringAttributeValue;
    N?: NumberAttributeValue;
  .....
}
Hence, item.orderId gives us an instance of AttributeValue and then we use .S or .N to get the corresponding value.
Step 7: Finishing the OrderRequest class
isAGetOrder()should return TRUE given a GET request beginning with/ordersas the path partorderId()should return the value of path parameterorderId
import {APIGatewayEvent} from "aws-lambda";

export class OrderRequest {
    constructor(private readonly event: APIGatewayEvent) {
    }
    //return true if the request is a GET request, with path starting from /orders and containing a path parameter
    isAGetOrder(): boolean {
        return this.event.httpMethod === "GET" &&
               this.event.path.startsWith("/orders") &&
               this.event.pathParameters.orderId != null;
    }
    orderId(): string {
        return this.event.pathParameters.orderId; //order id is passed as path parameter
    }
}
Step 8: Introducing async/await in service and controller
Let’s introduce async and await in the handler, controller and the service.
//handler.ts
export const ordersHandler = async (event: APIGatewayEvent): Promise<any> => {
    return await new OrderController().handle(new OrderRequest(event));
};

//OrderController.ts
async handle(orderRequest: OrderRequest) {
    if (orderRequest.isAGetOrder()) {
        return await this.findAnOrderBy(orderRequest.orderId())
    }
    return null;
}

private async findAnOrderBy(id: string) {
    return await this.orderService.findAnOrderBy(id);
}

//OrderService.ts
async findAnOrderBy(id: string) {
    return await this.repository.findAnOrderBy(id);
}
Step 9: Lambda response with API gateway
When an AWS lambda works behind an API gateway, it is expected to return a response in a specific format. This looks like:
{
   "statusCode": Http Status Code,
   "body": Response body,
   "headers": Response headers
}
It would be great if the controller knows the least about this structure. All it should do is return a response with an Order object. Let’s create an abstraction that takes an object T and knows about the final HTTP response. Let’s name this abstraction as Response.
export class Response<T> {
    private constructor(readonly status: HttpStatus, readonly body?: T) {
    }
    //signifies 200 response
    static ok<T>(body: T) {
        return new Response(HttpStatus.OK, body);
    }
    //signifies 404 response
    static notFound() {
        return new Response(HttpStatus.NOT_FOUND);
    }
}

export class HttpStatus {
    static readonly OK = "200";
    static readonly NOT_FOUND = "404";
}
With the introduction of the Response abstraction, the following will be the view of some classes:
import {OrderRequest} from "../model/OrderRequest";
import {OrderService} from "../service/OrderService";

export class OrderController {
    private orderService: OrderService;

    constructor() {
        this.orderService = new OrderService();
    }

    async handle(orderRequest: OrderRequest): Promise<Response<Order | unknown>> {
        if (orderRequest.isAGetOrder()) {
            const order = await this.findAnOrderBy(orderRequest.orderId());
            //return an Ok response if order is found else NotFound
            return order === null ? Response.notFound() : Response.ok<Order>(order);
        }
        return Response.notFound(); //return NotFound response
    }

    private async findAnOrderBy(id: string) {
        return await this.orderService.findAnOrderBy(id);
    }
}

export class Response<T> {
    private constructor(readonly status: HttpStatus, readonly body?: T) {
    }

    static ok<T>(body: T) {
        return new Response(HttpStatus.OK, body);
    }
    static notFound() {
        return new Response(HttpStatus.NOT_FOUND);
    }
    get() {
        //return a well formed JSON response
        return this.body === null ? {"statusCode": this.status} : {
            "statusCode": this.status,
            "body": JSON.stringify(this.body)
        }
    }
}

export class HttpStatus {
    static readonly OK = "200";
    static readonly NOT_FOUND = "404";
}
If the controller returns an instance of Response, the handler code can be changed to invoke the get() on the returned instance.
import {APIGatewayEvent} from "aws-lambda";
import {OrderRequest}    from "./model/OrderRequest";
import {OrderController} from "./controller/OrderController";

export const ordersHandler = async (event: APIGatewayEvent): Promise<any> => {
    const response = await new OrderController().handle(new OrderRequest(event));
    return response.get(); //handler invokes get() on the response returned from controller
};
That’s it. We have connected all the pieces, yes without any form of tests.
Step 10: Adding unit tests
Let’s add a couple of unit tests before we close the article. I will add all the necessary unit tests offline and commit the code. Before we can start with tests let’s add following dependencies;
npm install jest --save-devnpm install @types/jest --save-devnpm install ts-jest --save-devnpm install sinon --save-dev
jest configuration in jest.config.js:
module.exports = {
    "testMatch": [
        "**/__tests__/**/*.+(ts|tsx|js)",
        "**/?(*.)+(spec|test).+(ts|tsx|js)"
    ],
    "transform": {
        "^.+\\.(ts|tsx)$": "ts-jest"
    },
};
test script in package.json:
"scripts": {
  "test": "jest test/**"
}
Controller unit tests
Let’s add our first test that attempts to validate the status for finding an order by its id.
import {OrderController} from "../../src/controller/OrderController";
import {OrderRequest} from "../../src/model/OrderRequest";
import {APIGatewayEvent} from "aws-lambda";
import {HttpStatus} from "../../src/model/ModelAndResponseStatus";
import {OrderService} from "../../src/service/OrderService";
import {Order} from "../../src/model/Order";

import * as sinon from "sinon";

test("should return Ok as the response status given a request to find an order by id", async () => {
    sinon.stub(OrderService.prototype, "findAnOrderBy")
        .callsFake(() => sinon.mock(Order));

    const response = await new OrderController().handle(orderRequest("id-100"));

    expect(response.status).toEqual(HttpStatus.OK);
});

afterEach(() => {
    sinon.restore();
});

const orderRequest = (id: string) => {
    const apiGatewayEvent: APIGatewayEvent = {
        httpMethod: "GET",
        path: `/orders/${id}`,
        pathParameters: {
            "orderId": id
        },
        body: null,
        isBase64Encoded: false,
        headers: {},
        multiValueHeaders: {},
        queryStringParameters: {},
        multiValueQueryStringParameters: {},
        stageVariables: {},
        requestContext: null,
        resource: ""
    };
    return new OrderRequest(apiGatewayEvent);
};
One quick observation:
apiGatewayEventhad to be constructed with all the attributes even though we needed only pathParameters becauseAPIGatewayEventtype mandates all the attributes- visibility of status and model (in the next test) had to be changed from private to public, to assert on these fields
Another test could be to check the order returned from controller given an id.
test("should return an order given a request to find an order by id", async () => {
    sinon.stub(OrderService.prototype, "findAnOrderBy")
         .callsFake(() => new Order("id-100", 1445));

    const response = await new OrderController().handle(orderRequest("id-100"));

    expect(response.body!!).toEqual(new Order("id-100", 1445));
});
I guess we are ready to do TDD as well for Serverless.
Summary
Finally, we have come to an end of our first article where we made an attempt to design a small part of a serverless application that uses AWS Lambda, API Gateway and DynamoDB.
As a part of this application we have tried to draw some parallels with the MVC design pattern and bring the same to the serverless world.
Items that we have left:
- Exception handling is missing
- Controller checks if the request is for getting an order. This if/else ladder will grow given the same lambda handles creation and deletion of orders.
- Every component is unit testable in itself, except the repository layer that needs DynamoDB.
I am sure you will be able to fill these gaps and at this stage, I will move forward.
There is a lot of work still left before we can deploy the code:
- We need to have integration test(s) which can give us confidence if this entire application is actually working or not
- We need to integrate CDK (Cloud Development Kit) for deploying our infrastructure
- We need to have unit tests and snapshot tests for our CDK based infra code
Code is available here.