Concluding Serverless Journey
Background by Tamara Schipchinskaya on Unsplash
Table of contents
We have come a long way in our Serverless journey. This journey which started with building a serverless application has finally come to a stage where we can see all our hard work in action. We will be deploying our application in this article.
We will be using AWS CDK to deploy our application. Before we start using CDK, let’s quickly look at what is CDK -
The AWS Cloud Development Kit (AWS CDK) is an open source software development framework to model and provision your cloud application resources using familiar programming languages. Provisioning cloud applications can be a challenging process that requires you to perform manual actions, write custom scripts, maintain templates, or learn domain-specific languages. AWS CDK uses the familiarity and expressive power of programming languages for modeling your applications. It provides you with high-level components that preconfigure cloud resources with proven defaults, so you can build cloud applications without needing to be an expert. AWS CDK provisions your resources in a safe, repeatable manner through AWS CloudFormation. It also enables you to compose and share your own custom components that incorporate your organization’s requirements, helping you start new projects faster. https://aws.amazon.com/cdk/
In summary, we don’t have to directly deal with CloudFormation or SAM for deploying our application. We will provision our cloud resources using a higher level framework called CDK which will ultimately translate into a CloudFormation template.
We should be able to see the advantages of using CDK very soon but let’s look at this conversation to get some understanding of CDK.
Let’s begin now.
Step 1: Setting up the project
We will be using the same project which was pushed here.
- Install CDK globally by executing
npm install aws-cdk -g - Create a directory named
infrainside our projectserverless-order-service - Execute
cdk init app --language=typescriptinside theinfradirectory
This should generate a project that uses typescript as the programming language and jest as a testing framework. Let’s update the generated jest.config.js.
Below is how our jest.config.js will look like -
module.exports = {
    "testMatch": [
        "**/__tests__/**/*.+(ts|tsx|js)",
        "**/?(*.)+(spec|test).+(ts|tsx|js)"
    ],
    "transform": {
        "^.+\\.(ts|tsx)$": "ts-jest"
    },
};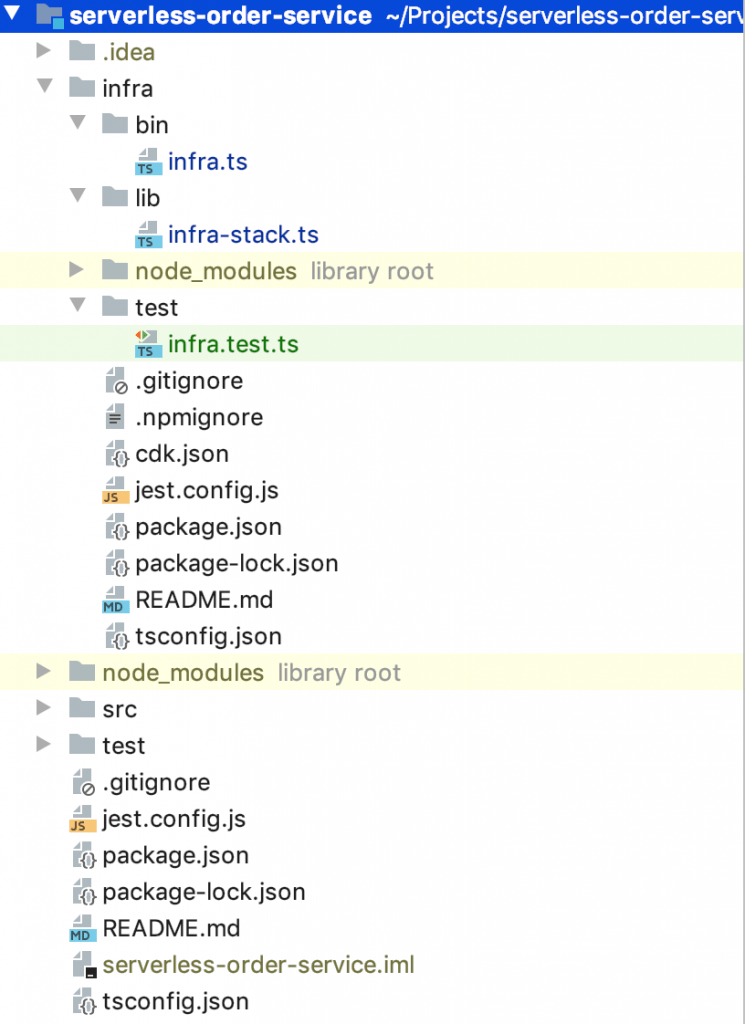
If all has gone well so far this how our project structure will look like -
infra-stack.tsdefines a class calledInfraStackwhich is going to be a logical collection of various constructs like lambda function(s), dynamodb etcinfra.tsis the entry point of the application that creates an instance ofInfraStackinfra.test.tscontains a simple test to assert an empty stackpackage.jsoncontains the project definition along with various dependencies including@aws-cdk/assertwhich is a library for asserting various cloud resourcesjest.config.jscontains the necessary configuration to run jest testscdk.jsoncontains the command to run cdk application
Let’s make a few quick changes to the file names to match our convention, run the test and commit the changes:
- Rename
infra.tstoOrderServiceInfra.ts - Rename
infra-stack.tstoOrderServiceInfraStack.ts - Rename
infra.test.tstoOrderServiceInfraStack.spec.ts
Step 2: Creating stack with the lambda function
Let’s provision our lambda function. In order to do so we need to add a dependency @aws-cdk/aws-lambda. So, let’s add it by executing npm install @aws-cdk/aws-lambda@1.19.0.
We will start by creating a lambda function construct inside OrderServiceInfraStack.
import * as cdk from "@aws-cdk/core";
import {Function} from "@aws-cdk/aws-lambda";

export class OrderServiceInfraStack extends cdk.Stack {
    constructor(scope: cdk.Construct, id: string, props?: cdk.StackProps) {

    super(scope, id, props);
        //create a lambda function in the stack
        new Function(this, "order-service-function", null); //compilation error
    }
}
Few quick observations:
-
We have imported Function class from
@aws-cdk/aws-lambda -
Constructor of Function class takes 3 parameters:
scope: Construct- which identifies the parent resourceid: string- unique identifier of the resource within the stackprops: FunctionProps- lambda function properties including name, runtime, handler etc
-
Typescript compiler gives an error because null is not acceptable in place of
FunctionProps
Let’s pass the required function properties -
import {Code, Function, FunctionProps, Runtime} from "@aws-cdk/aws-lambda";
import {Construct, Stack, StackProps} from "@aws-cdk/core";
export class OrderServiceInfraStack extends Stack {
constructor(scope: Construct, id: string, props?: StackProps) {
super(scope, id, props);
//create FunctionProps
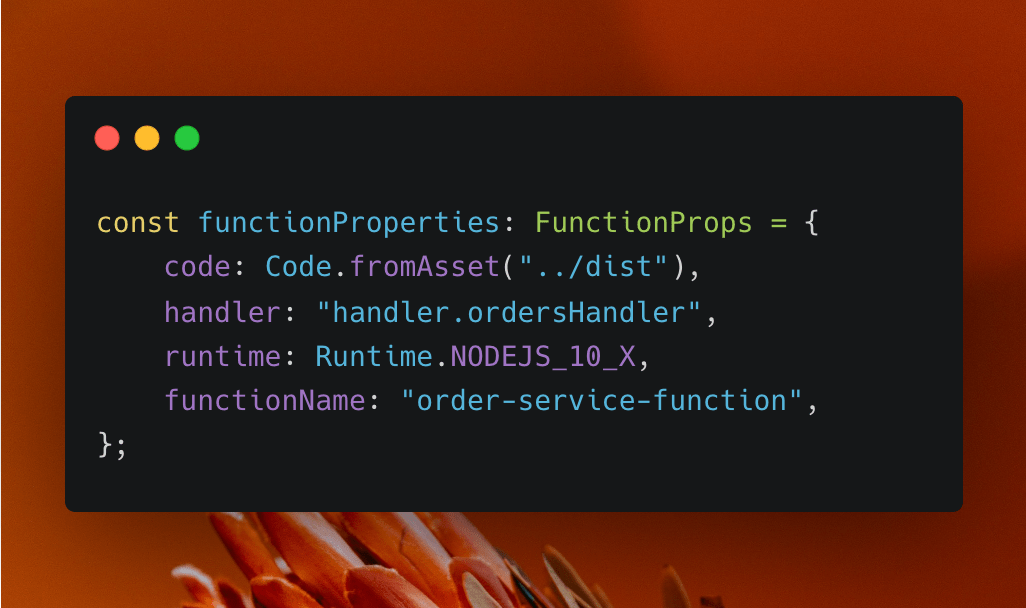
const functionProperties: FunctionProps = {
code: Code.fromAsset("../dist"),
handler: "handler.ordersHandler",
runtime: Runtime.NODEJS_10_X,
functionName: "order-service-function",
environment: {"ExecutionEnvironment": "dev"}
};
//create a lambda function in the stack
new Function(this, "order-service-function", functionProperties);
}
}Here, the code, handler and the runtime are the only mandatory properties. Passing them should make the compiler happy.
With this change in the OrderServiceInfraStack, our test will break because it asserts for empty resources inside the stack but now the stack contains a lambda function. We will fix the test in a moment.
Quick observations:
- We are passing the
ExecutionEnvironmentas lambda environment variable. This variable is used to determine if the lambda is running in the test mode or the production mode. This value can also be taken as deployment parameter, but for now we are passing it as dev - We have used
../distinside code asset which contains our transpiled code
Step 3: Fixing the test
CDK allows us to write different forms of tests including snapshot tests and fine-grained unit tests. We will be writing both the tests - snapshot test(s) for our entire stack and unit tests for resources like lambda function, DynamoDB and API gateway etc.
We will be starting with unit tests which will assert on a resource and its properties.
import {OrderServiceInfraStack} from "../lib/OrderServiceInfraStack";
import {App} from "@aws-cdk/core";
import {Runtime} from "@aws-cdk/aws-lambda";
import "@aws-cdk/assert/jest";

test("stack should contain a lambda function with node10 as the runtime", () => {
    const app = new App();
    const stack = new OrderServiceInfraStack(app, "OrderServiceStack"); //instantiate stack

    //assert that stack contains a lambda function with node10 as the runtime
    expect(stack).toHaveResource("AWS::Lambda::Function", {
        Runtime: Runtime.NODEJS_10_X.toString()
    })
});
Few quick observations:
- We have imported
aws-cdk/assert/jestthat provides us withexpectfunction that allows us to match resources in the stack - Our unit test asserts only on lambda’s runtime property
That’s it. Our lambda function resource is created in the stack, and we have been able to write a unit test. Let’s commit the changes.
Step 4: Adding DynamoDB to the stack
Let’s provision DynamoDB. In order to do so we need to add a dependency @aws-cdk/aws-dynamodb. So, let’s add it by executing npm install @aws-cdk/aws-dynamodb@1.19.0.
import {Code, Function, FunctionProps, Runtime} from "@aws-cdk/aws-lambda";
import {Construct, Stack, StackProps} from "@aws-cdk/core";
import {AttributeType, Table, TableProps} from "@aws-cdk/aws-dynamodb";

export class OrderServiceInfraStack extends Stack {
  constructor(scope: Construct, id: string, props?: StackProps) {
        super(scope, id, props);

        const functionProperties: FunctionProps = {
            code: Code.fromAsset("../dist"),
            handler: "handler.ordersHandler",
            runtime: Runtime.NODEJS_10_X,
            functionName: "order-service-function",
            environment: {"ExecutionEnvironment": "dev"}
        };
        new Function(this, "order-service-function", functionProperties);

        //create TableProps
        const tableProps: TableProps = {
            partitionKey: {
                name: "orderId",
                type: AttributeType.STRING
            },
            tableName: "orders"
        };
        //create a dynamo table in the stack
        new Table(this, "order-table", tableProps);
    }
}
Few quick observations:
- We have imported the
Tableclass from@aws-cdk/aws-dynamodb - Constructor of the
Tableclass takes 3 parameters:scope: Construct- which identifies the parent resourceid: string- unique identifier of the resource within the stackprops: TableProps- table properties including name of the table, partitionKey etc.
That’s it. Our DynamoDB table resource is created in the stack. Let’s verify by writing a unit test.
test("stack should contain a dynamodb table with table name", () => {
    const app = new App();
    const stack = new OrderServiceInfraStack(app, "OrderServiceStack");

    //assert that stack contains a dynamo table with "orders" as the table name
    expect(stack).toHaveResource("AWS::DynamoDB::Table", {
        "TableName": "orders"
    })
});

test("stack should contain a dynamodb table with orderId as the Hash key", () => {
    const app = new App();
    const stack = new OrderServiceInfraStack(app, "OrderServiceStack");

    //assert that stack contains a dynamo table with "orderId" as the HASH key
    expect(stack).toHaveResource("AWS::DynamoDB::Table", {
        "KeySchema": [
            {
                "AttributeName": "orderId",
                "KeyType": "HASH"
            }
        ]
    })
});
Step 5: Refactoring the stack
Let’s look at a unit test and see if there are any challenges in understanding it.
test("stack should contain a lambda function with node10 as runtime", () => {
    const app = new App();
    const stack = new OrderServiceInfraStack(app, "OrderServiceStack");

    expect(stack).toHaveResource("AWS::Lambda::Function", {
        Runtime: Runtime.NODEJS_10_X.toString()
    })
});- How do you know our stack will contain a lambda function with
node10as the runtime? Honestly, there is no relation between the test input and its output - Even though the test is for
OrderServiceStack, I see that we are trying to assert on properties of a resource. It somehow looks to me like a misplaced test
In order to solve both the problems, we can create a component (or a class) that accepts configuration properties and creates a lambda function. This means we will be able to move lambda function unit tests closer to that class and make the unit tests more revealing. Let’s see how.
Let’s consider that all our lambda functions are based on node10 runtime. With this consideration, we can create a class, Node10LambdaFunction that represents a lambda function and accepts Node10LambdaFunctionProperties.
This is the way which we will take in the article, you should try other approaches and please share them.
import {Code, Function, FunctionProps, Runtime} from "@aws-cdk/aws-lambda";
import {Construct} from "@aws-cdk/core";

//inherit from Function
export class Node10LambdaFunction extends Function {
    //accepts Node10FunctionProperties which will contain attributes that make sense for our project
    constructor(scope: Construct, properties: Node10FunctionProperties) {
        super(scope, properties.functionName, properties.toFunctionProps())
    }
}

class Node10LambdaFunctionProperties {
    //attributes that make sense at this stage
    constructor(private readonly code: Code,
                private readonly handler: string,
                readonly functionName: string,
                private readonly environmentVariables?: {[key: string]: string }) {
    }

    //behavior to return AWS FunctionProps
    toFunctionProps(): FunctionProps {
        return {
            code: this.code,
            handler: this.handler,
            runtime: Runtime.NODEJS_10_X,
            functionName: this.functionName,
            environment: this.environmentVariables
        }
    }
}
Few quick observations:
- Client of
Node10LambdaFunction(which is going be our stack now) is not required to pass runtime as it is evident from the name itself - Client code is not required to pass the
idof the resource.Node10LambdaFunctionpasses function name as the id of the resource
Now, we can move the lambda function unit tests closer to Node10LambdaFunction. This is how the updated test(s) will look like:
test("stack should contain a lambda function with node10 as runtime", () => {
    const stack = new Stack();
    const properties = new Node10LambdaFunctionProperties(
        Code.fromAsset("../dist"),
        "handler.ordersHandler",
        "order-service-function");

    //name of the class indicates a lambda function with node10 as the runtime will be created
    new Node10LambdaFunction(stack, properties);

    //assert that stack contains a lambda function with node10 as the runtime. This time the test is not magical
    expect(stack).toHaveResource("AWS::Lambda::Function", {
        Runtime: Runtime.NODEJS_10_X.toString()
    })
});

test("stack should contain a lambda function with specified environment variable", () => {
    const stack = new Stack();
    const properties = new Node10LambdaFunctionProperties(
        Code.fromAsset("../dist"),
        "handler.ordersHandler",
        "order-service-function",
        {"env": "dev"}
    );

    new Node10LambdaFunction(stack, properties);

    //assert that stack contains a lambda function with provided environment variable
    expect(stack).toHaveResource("AWS::Lambda::Function", {
        Environment: {
            Variables: {
                "env": "dev"
            }
        }
    })
});
Here, we are not instantiating OrderServiceStack but creating an empty stack which gets passed to Node10LambdaFunction.
Similarly, we can write other tests around lambda function like: assert that lambda function is created with a given name, assert that lambda function is inside a VPC etc. I will make similar changes for the Dynamo table and commit the code.
With these changes, we can write unit tests for various components (as fine-grained as we want) and a snapshot test for the entire stack.
Step 6: Adding lambda backed public REST API to the stack
Let’s provision a REST API. In order to do so we need to add a dependency @aws-cdk/aws-apigateway. So, let’s add it by executing npm install @aws-cdk/aws-apigateway@1.19.0.
Following the same pattern we would like to create a class that allows us to add an endpoint that can be accessed publicly and is backed by a lambda function.
import {LambdaRestApi, LambdaRestApiProps, MethodLoggingLevel} from "@aws-cdk/aws-apigateway";
import {Construct} from "@aws-cdk/core";
import {Node10LambdaFunction} from "../../function/Node10LambdaFunction";
import {IFunction} from "@aws-cdk/aws-lambda";

//inherit from LambdaRestApi
class LambdaBackedPublicRestApi extends LambdaRestApi {

    //similar to Node10Function, it accepts LambdaBackedPublicRestApiProperties
    constructor(scope: Construct, properties: LambdaBackedPublicRestApiProperties) {
        super(scope, properties.apiName, properties.toLambdaRestApiProps());
    }
}

class LambdaBackedPublicRestApiProperties {

    constructor(readonly apiName: string,
                private readonly stageName: string,
                private handler: Node10LambdaFunction) {
    }

    //behavior to return LambdaRestApiProps
    toLambdaRestApiProps(): LambdaRestApiProps {
        return {
            restApiName: this.apiName,
            deployOptions: {
                stageName: this.stageName,
                loggingLevel: MethodLoggingLevel.INFO
            },
            proxy: false,
            handler: this.handler as IFunction
        }
    }
}
This will create a REST API in the stack for us but there is no endpoint available for us. In order to allow that to happen we can expose a method that takes a resource path say - orders/{orderId} and a http method which needs to be attached to the last part of resource which in this example is {orderId}.
So, let’s do this.
import {
    LambdaRestApi,
    LambdaRestApiProps,
    MethodLoggingLevel,
    Resource
} from "@aws-cdk/aws-apigateway";

import {Construct} from "@aws-cdk/core";
import {Node10LambdaFunction} from "../../function/Node10LambdaFunction";
import {IFunction} from "@aws-cdk/aws-lambda";

class LambdaBackedPublicRestApi extends LambdaRestApi {

    constructor(scope: Construct, properties: LambdaBackedPublicRestApiProperties) {
        super(scope, properties.apiName, properties.toLambdaRestApiProps());
    }

    //add resource say, orders/{orderId} and a method GET against {orderId}
    addEndpoint(resourcePath: string, httpMethod: HttpMethod) {
        if (resourcePath.startsWith("/"))
            throw new IllegalArgumentException(
                `${resourcePath} should not begin with a / while adding a rest endpoint`
            );

        const resource = this.addAllResourcesUsing(resourcePath);
        resource.addMethod(httpMethod);
    }

    //add resources recursively
    private addAllResourcesUsing(resourcePath: string): Resource {
        function add(resources: string[], rootResource: Resource): Resource {
            if (resources.length === 0)
                return rootResource;
            else
                return add(
                    resources.slice(1, resources.length),
                    LambdaBackedPublicRestApi.getOrAdd(resources[0], rootResource)
                );
        }

        return add(resourcePath.split("/"), (this.root as Resource));
    }

    //return the already added resource or add
    private static getOrAdd(resourcePath: string, rootResource: Resource): Resource {
        const alreadyPresentResource = rootResource.getResource(resourcePath) as Resource;
        return alreadyPresentResource || rootResource.addResource(resourcePath)
    }
}

enum HttpMethod {
  GET = "GET"
}

class IllegalArgumentException extends Error {}
Few quick observations -
- We do not expect the resource path to begin with a ”/”,
aws-apigatewaythrows an error if that is the case - We are recursively adding each resource from the resource path
- HTTP method gets added on the last resource of the resource path
getOrAddensures that we do not add the same resource again. Eg; if we want to add 2 resource pathsserverless/lambdaandserverless/lambda/{functionId}, it is necessary to ensure we do not addserverless/lambdaagain
Let’s quickly add a couple of unit tests.
import {LambdaBackedPublicRestApi} from "../../../lib/restapi/public/LambdaBackedPublicRestApi";
import {Stack} from "@aws-cdk/core";
import {LambdaBackedPublicRestApiProperties} from "../../../lib/restapi/public/LambdaBackedPublicRestApiProperties";
import {Node10LambdaFunctionProperties} from "../../../lib/function/Node10LambdaFunctionProperties";
import {Code} from "@aws-cdk/aws-lambda";
import {Node10LambdaFunction} from "../../../lib/function/Node10LambdaFunction";
import {HttpMethod} from "../../../lib/restapi/public/HttpMethod";
import {CfnMethod} from "@aws-cdk/aws-apigateway";
import "@aws-cdk/assert/jest";

const addFakeEndpoint = (api: LambdaBackedPublicRestApi) => {
    api.addEndpoint("fake", HttpMethod.GET);
};

test("stack should contain a public api with a name", () => {
    const stack = new Stack();
    const node10LambdaFunction = new Node10LambdaFunction(
        stack,
        new Node10LambdaFunctionProperties(
        Code.fromAsset("../dist"),
        "handler.ordersHandler",
        "order-service-function")
    );

    const properties = new LambdaBackedPublicRestApiProperties(
        "orders-api",
        "dev",
        node10LambdaFunction
    );

    const api = new LambdaBackedPublicRestApi(stack, properties);
    addFakeEndpoint(api);

    //assert that stack contains a rest api with "orders-api" as the name
    expect(stack).toHaveResource("AWS::ApiGateway::RestApi", {
        Name: "orders-api"
    });
});

test("stack should contain a public api with an http method GET added to the resource", () => {
    const stack = new Stack();
    const node10LambdaFunction = new Node10LambdaFunction(
        stack,
        new Node10LambdaFunctionProperties(
        Code.fromAsset("../dist"),
        "handler.ordersHandler",
        "order-service-function")
    );

    const properties = new LambdaBackedPublicRestApiProperties(
        "orders-api",
        "dev",
        node10LambdaFunction
    );

    const api = new LambdaBackedPublicRestApi(stack, properties);
    api.addEndpoint("article/serverless", HttpMethod.GET);

    //get a resource and a CfnMethod against that resource
    const serverlessResource = api.root.getResource("article")?.getResource("serverless");
    const method = serverlessResource?.node.findChild("GET") as CfnMethod;

    expect(method.httpMethod).toEqual(HttpMethod.GET);
});
These tests assert that a REST API exists with a given name and a http method is attached to a resource.
Step 7: Updating the stack
Let’s update the stack to have lambda function, DynamoDB table, lambda backed public api and DynamoDB table read access to lambda function.
import {Code} from "@aws-cdk/aws-lambda";
import {Construct, Stack, StackProps} from "@aws-cdk/core";
import {AttributeType} from "@aws-cdk/aws-dynamodb";
import {Node10LambdaFunction} from "./function/Node10LambdaFunction";
import {Node10LambdaFunctionProperties} from "./function/Node10LambdaFunctionProperties";
import {DynamoTable} from "./dynamodb/DynamoTable";
import {DynamoTableProperties} from "./dynamodb/DynamoTableProperties";
import {PrimaryKey} from "./dynamodb/PrimaryKey";
import {PartitionKey} from "./dynamodb/PartitionKey";
import {LambdaBackedPublicRestApi} from "./restapi/public/LambdaBackedPublicRestApi";
import {LambdaBackedPublicRestApiProperties} from "./restapi/public/LambdaBackedPublicRestApiProperties";
import {HttpMethod} from "./restapi/public/HttpMethod";

export class OrderServiceInfraStack extends Stack {
        constructor(scope: Construct, id: string, props?: StackProps) {
        super(scope, id, props);

        //use the newly prepared classes
        const ordersFunction = this.ordersFunction();
        const ordersTable    = this.ordersTable();
        const restApi        = this.lambdaBackedPublicRestApi(ordersFunction);

        restApi.addEndpoint("orders/{orderId}", HttpMethod.GET); //add the required resources along with HTTP method
        ordersTable.grantReadData(ordersFunction); //grant read access on "orders" table to lambda function
    }

    //returns an instance of Node10LambdaFunction
    private ordersFunction() {
        return new Node10LambdaFunction(this, new Node10LambdaFunctionProperties(
            Code.fromAsset("../dist"),
            "handler.ordersHandler",
            "order-service-function",
            {"ExecutionEnvironment": "dev"})
        );
    }

    //returns an instance of DynamoTable
    private ordersTable() {
        return new DynamoTable(this, new DynamoTableProperties(
            "orders",
            new PrimaryKey(
                new PartitionKey(
                    "orderId",
                    AttributeType.STRING)
            ))
        );
    }

    //returns an instance of LambdaBackedPublicRestApi
    private lambdaBackedPublicRestApi(lambda: Node10LambdaFunction) {
        return new LambdaBackedPublicRestApi(this, new LambdaBackedPublicRestApiProperties(
            "orders-api",
            "dev",
            lambda
        ));
    }
}
Time to add our snapshot test, probably simpler than you might have thought of:
import {OrderServiceInfraStack} from "../lib/OrderServiceInfraStack";
import {App} from "@aws-cdk/core";
import "@aws-cdk/assert/jest";

test("should create order service stack", () => {
    const app = new App();
    const stack = new OrderServiceInfraStack(app, "OrderServiceStack");

    expect(stack).toMatchSnapshot();
});
Step 8: Deploying our stack
We have worked hard to create all the resources that are needed in our stack. Now is the time to deploy our stack and see things in action.
Let’s update OrderServiceInfra to pass stack name as a part of stack properties. It is this file which acts as an entry point for the application and is referred in cdk.json.
#!/usr/bin/env node
import "source-map-support/register";
import {OrderServiceInfraStack} from "../lib/OrderServiceInfraStack";
import {StackProps} from "@aws-cdk/core";
import cdk = require("@aws-cdk/core");

const app = new cdk.App();

//pass stack name
const stackProps:StackProps = {
  stackName: "order-service-stack"
};
//instantiate OrderServiceInfraStack
new OrderServiceInfraStack(app, "OrderServiceStack", stackProps);
CDK also provides us with various commands -
cdk list- lists the stackscdk deploy- deploys the stack in AWS environmentcdk destroy- destroys the stackscdk synthesize- synthesizes and prints the CloudFormationcdk bootstrap- deploys the CDK toolkit stack into an AWS environment
We need to execute cdk bootrap and cdk deploy from the infra directory to deploy stack in our AWS account.
> cd infra
> cdk bootstrap
> cdk deploy
These commands make a few assumptions -
- AWS credentials are already configured on the host machine
- AWS user has the right to create various AWS resources including IAM roles
dist/directory which will be deployed on an S3 bucket (bootstrap creates for us) when we executecdk bootstrap, already exists
It will take sometime for stack to be created which will consist of lambda function, DynamoDB table, API gateway and all the necessary IAM roles.
Once our stack is created, make an entry in the orders table, hit the public API endpoint which will look like https://rest-api-id.execute-api.ap-south-1.amazonaws.com/dev/orders/OrderId and enjoy the output.
That’s it, our stack is deployed and our application is up and running 😁
Conclusion
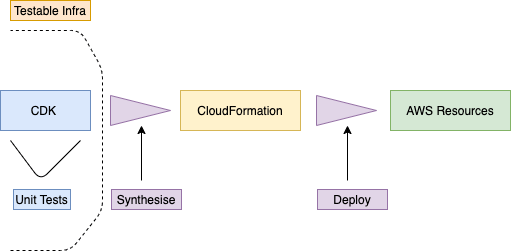
Relationship between CDK and CloudFormation can be summarised as -
In this article we were able to code our infra using CDK, write tests for our infra and deploy the same. Let’s take a look at some advantages of using CDK:
- Resources can be modeled in Object-Oriented manner
- High level abstractions can be defined and published within the team or company
- Infrastructure can be built as library
- Infrastructure code can be tested
- IDE’s code completion can be leveraged
- Programming language constructs like if statements, for-loops, etc. can be used when defining infrastructure
We have finally come to end of our Serverless Journey series. Hope you enjoyed it.