A guide to Serializable Snapshot Isolation in Key/Value storage engine
Posted on March 22, 2024 • 22 minutes • 4576 words
Table of contents
Ensuring data consistency in the face of concurrent transactions is a critical challenge in database management. Traditional serializable isolation, while guaranteeing data integrity, often suffers from performance bottlenecks due to extensive locking. This article explores Serializable Snapshot Isolation (SSI) that promises the best of both worlds: strong data consistency without sacrificing performance. The article delves into the inner workings of SSI and explore its implementation for a Key/Value storage engine. I will refer to the research paper titled A critique of snapshot isolation .
Introduction
We will start by defining a few terms.
- Transaction: is an atomic unit of work. A database transaction may involve writes to multiple tables, or multiple writes to a single table or maybe multiple writes to multiple tables. In a Key/Value storage engine, the transaction pseudo-code would look like:
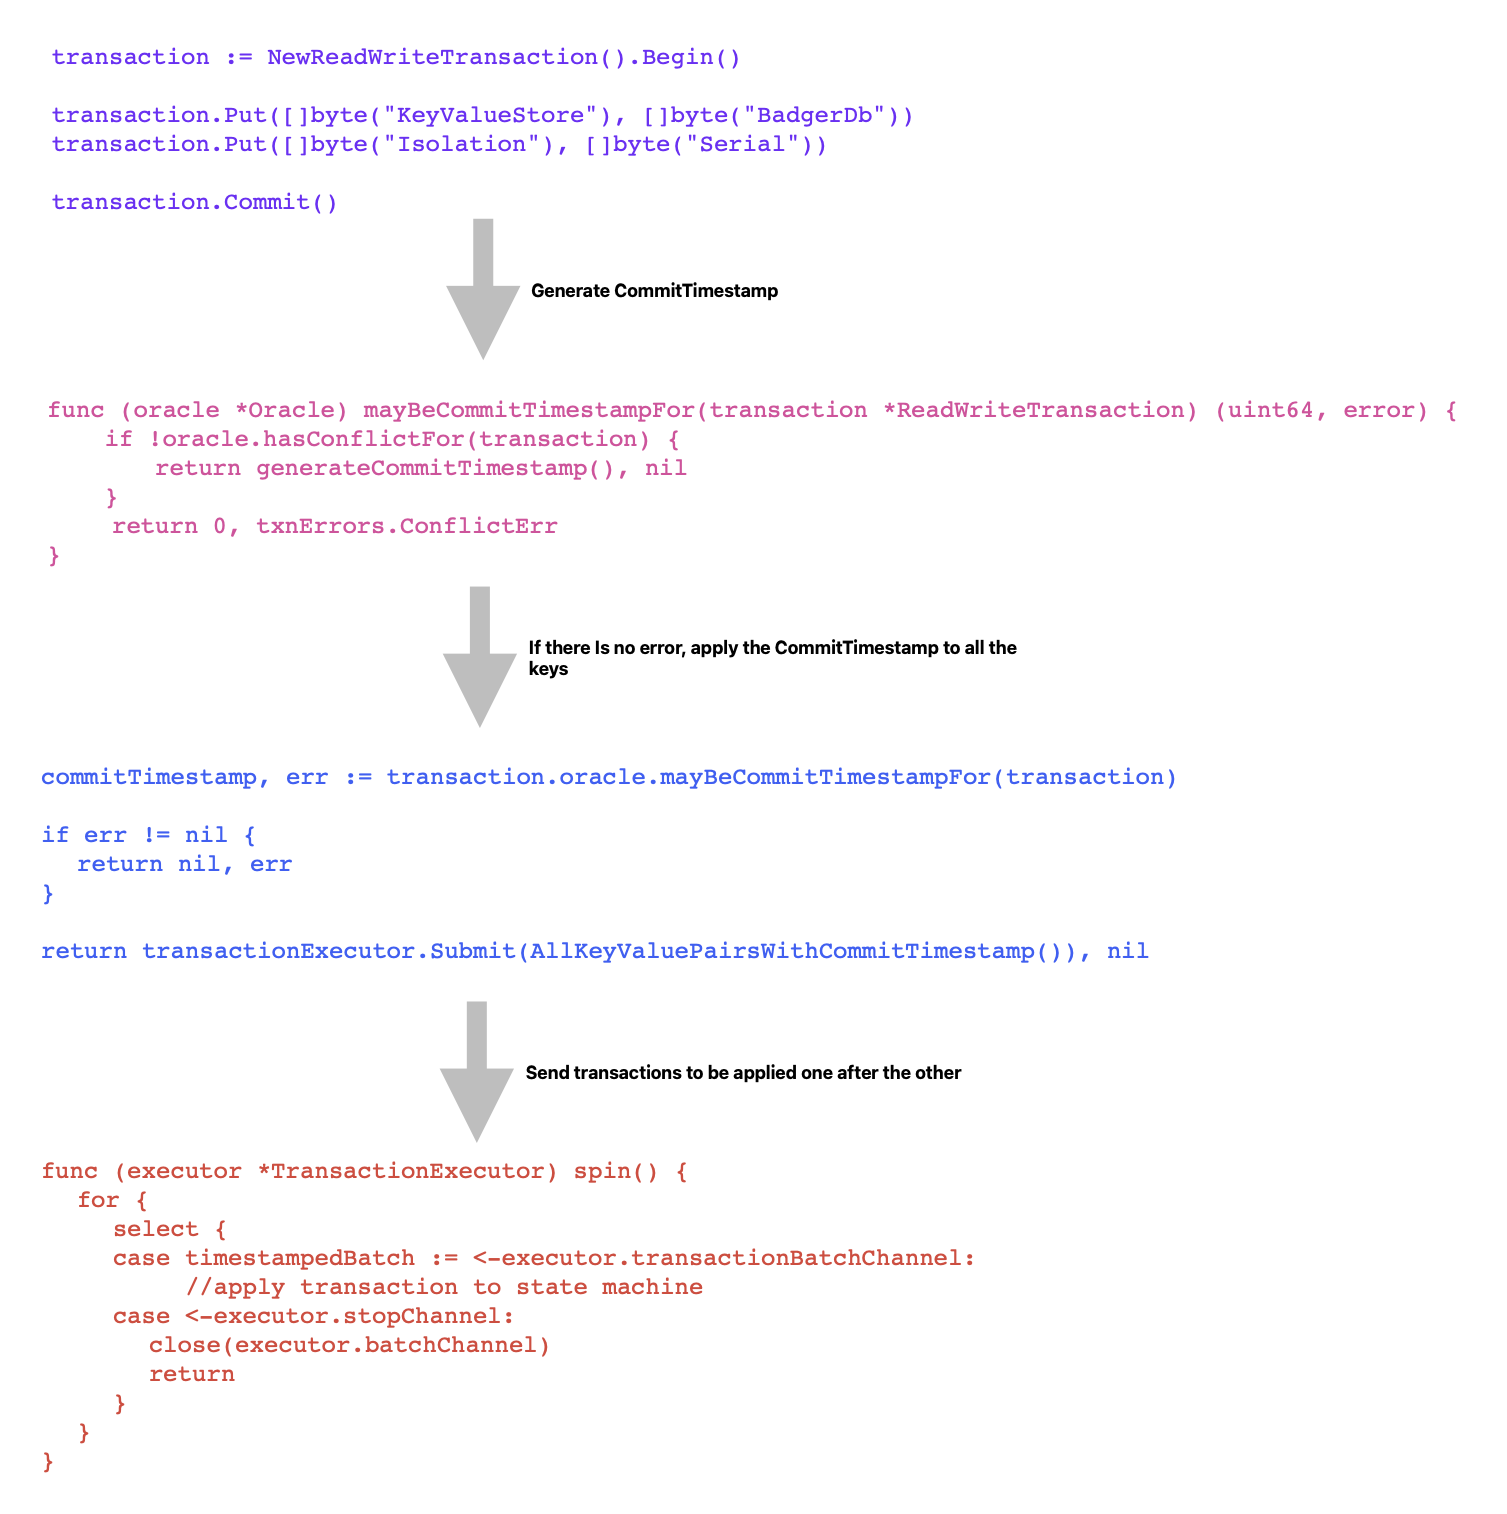
transaction := NewReadWriteTransaction().Begin()
transaction.Put([]byte("KeyValueStore"), []byte("BadgerDb"))
transaction.Put([]byte("StoreType"), []byte("LSM"))
transaction.Delete([]byte("DiskType"))
transaction.Commit()
The code snippet creates an instance of a pseudo ReadWriteTransaction, puts a couple of key/value pairs, deletes a key and then commits the transaction.
By definition, a transaction is atomic, which means all these actions will take place as a unit or none of them will take place.
Isolation: defines the behavior of the system in presence of other concurrent transactions. A system that provides Serial transaction isolation ensures that all the transactions run serially - one after the other. Imagine that you are building a transactional Key/Value storage engine. The kind of questions that you will ask while implementing transaction isolation would include:
- What happens when two transactions write to the same key at the same time?
- What happens when a transaction attempts to read the value of a key, which is being written to by another transaction?
- Can a readonly transaction abort?
Snapshot isolation: the snapshot from which a transaction reads is not affected by concurrently running transactions. To support snapshot isolation, databases and Key/Value storage engines maintain multiple versions of the data. Anytime a transaction begins, it is given a
beginTimestampand if a transaction commits without any conflict, it is given acommitTimestamp. A transaction txn(i) with a begin timestamp of Tb(txn(i)) reads the latest version of data (/key) with the commit timestamp C < Tb(txn(i)). Two concurrent transactions can still conflict if there is a write-write conflict, meaning, two transactions writing to the same key (in a Key/Value storage engine).Serializable Snapshot isolation: the snapshot from which a transaction reads is not affected by concurrently running transactions. The core idea of maintaining multiple versions of data remains the same. Two concurrent transactions can still conflict if there is a read-write conflict,
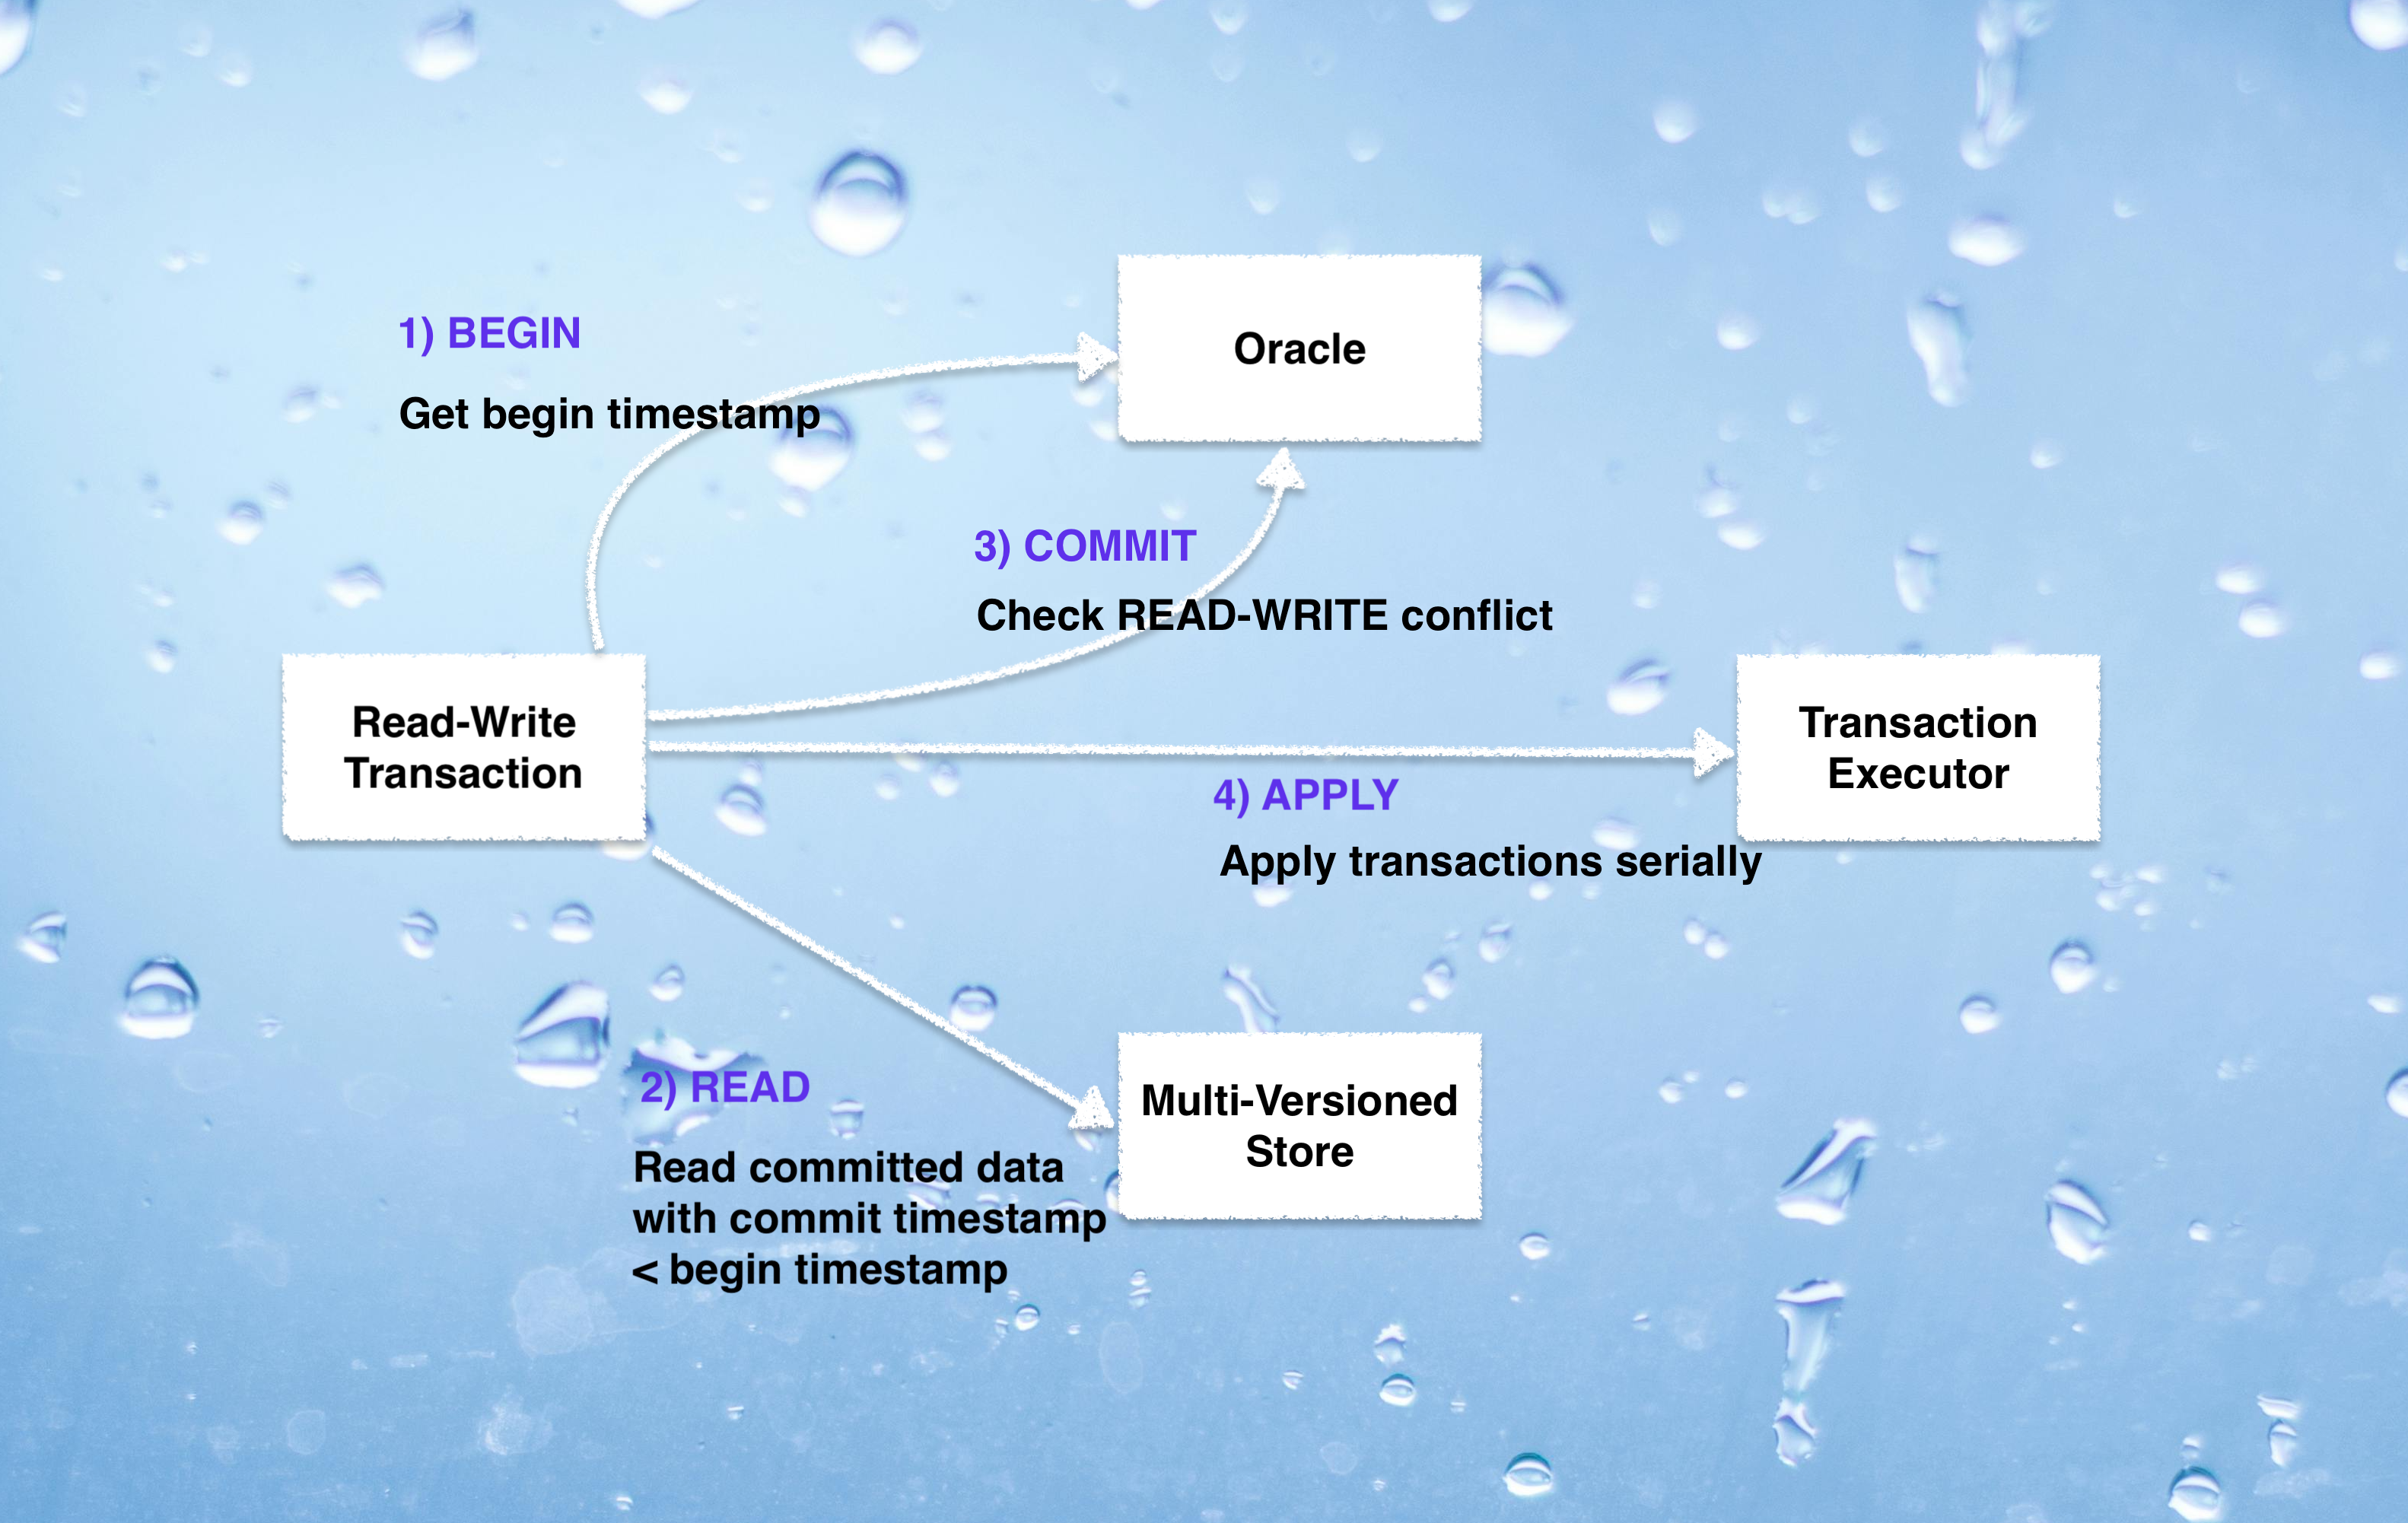
MVCC: stands for multi-version concurrency control. It is the backbone for implementing transactions with Snapshot or Serializable Snapshot isolation. In a multi-versioned Key/Value storage engine, each key is given a version which is incremented every time a write happens in the storage engine. The following visual should help in building a light mind-map of a read/write transaction flow in a Key/Value storage engine that supports MVCC with Serializable Snapshot isolation.
The flow can be summarized as:
- Create an instance of
ReadWriteTransactionand use it to perform relevant operations. Committhe transaction.- When the transaction is committed, generate
CommitTimestamp. (CommitTimestampserves as the version for all the keys in the MVCC store). If there is no read-write conflict, the timestamp will be generated for the transaction. - Update all the keys in the transaction with the generated
CommitTimestamp. - Serially apply all the transactions to the state machine of the Key/Value storage engine.
Let’s go a little deeper into Snapshot isolation.
Understanding Snapshot isolation
In Snapshot isolation, the snapshot from which a transaction reads is not affected by concurrently running transactions. To support snapshot isolation, databases and Key/Value storage engines maintain multiple versions of the data .
The high-level implementation of Get in Snapshot isolation, in a Key/Value storage engine can be summarized as:
- Each transaction is given a
beginTimestamp. It is an increasing number. - Timestamps are assigned by a centralized authority called
Oracle(orTimestamp Oracle). - A transaction txn(i) with a begin timestamp of Tb(txn(i)) reads the latest version of keys with the commit timestamp C < Tb(txn(i)).
- Simply put, a transaction txn(i) observes all the changes that have been committed before the start of txn(i).
Before we explore the intricacies of Oracle implementation, let’s briefly examine the beginTimestamp method.
type Oracle struct {
    lock            sync.Mutex
    nextTimestamp   uint64
	//other fields omitted
}

func NewOracle() *Oracle {
  oracle := &Oracle{
    nextTimestamp: 1,
  }
  return oracle
}

func (oracle *Oracle) beginTimestamp() uint64 {
    oracle.lock.Lock()
    beginTimestamp := oracle.nextTimestamp - 1
    oracle.lock.Unlock()

	//code omitted
	return beginTimestamp
}
Every transaction gets a beginTimestamp which is represented as uint64 (64 bits).
The nextTimestamp field of Oracle denotes the commitTimestamp that shall be given to the next ready-to-commit transaction. Based on the field nextTimestamp, we can derive the beginTimestamp.
- If the
nextTimestampis 10, the next transaction that is ready to commit will be given 10 as itscommitTimestamp. - This means 9 is the latest
commitTimestampthat is given to some transaction txn(some). - This means that the current transaction txn(current) can be awarded 9 as its
beginTimestamp. - So,
beginTimestamp = nextTimestamp - 1. - Simply put, txn(current) can read keys with
commitTimestamp< 9, where 9 is thebeginTimestampof txn(current).
A ReadWriteTransaction is assigned a commitTimestamp when it is ready to commit. Before assigning the commitTimestamp, it is necessary to
check that there are no write-write conflicts. Two concurrent transactions can conflict in Snapshot isolation if:
- Both the transactions txn(i) and txn(j) write to the same key called Spatial overlap, and
- Both the transaction have a Temporal Overlap. Tb(txn(i))
<Tc(txn(j)) and Tb(txn(j))<Tc(txn(i)), where Tb(txn(i)) represents thebeginTimestampof txn(i), Tc(txn(i)) represents thecommitTimestampof txn(i),Tb(txn(j)) represents thebeginTimestampof txn(j), Tc(txn(j)) represents thecommitTimestampof txn(j).
Let’s write the pseudo-code for committing a transaction txn(i) with beginTimestamp as Tb.
## detect conflict
for each key in keysToCommit:
    if lastCommit(key) > txn.beginTimestamp()
	    abort;
    end if;
end for;

## prepare for commit
commitTimestamp <- oracle.commitTimestamp();
for each key in keysToCommit:
   lastCommit(key) <- commitTimestamp
end for;

## apply commits
The pseudo-code checks for:
- spatial overlap, and
- only the first part of temporal overlap condition. If a newer commit exists for any key that the transaction is going to write such that,
lastCommit(key) > txn.beginTimestamp(), the transaction is aborted. This ensures that the transaction only operates on data that reflects the state at the start of the transaction, preventing inconsistencies caused by concurrent modifications.
Snapshot isolation prevents a lot of anomalies.
Anomalies
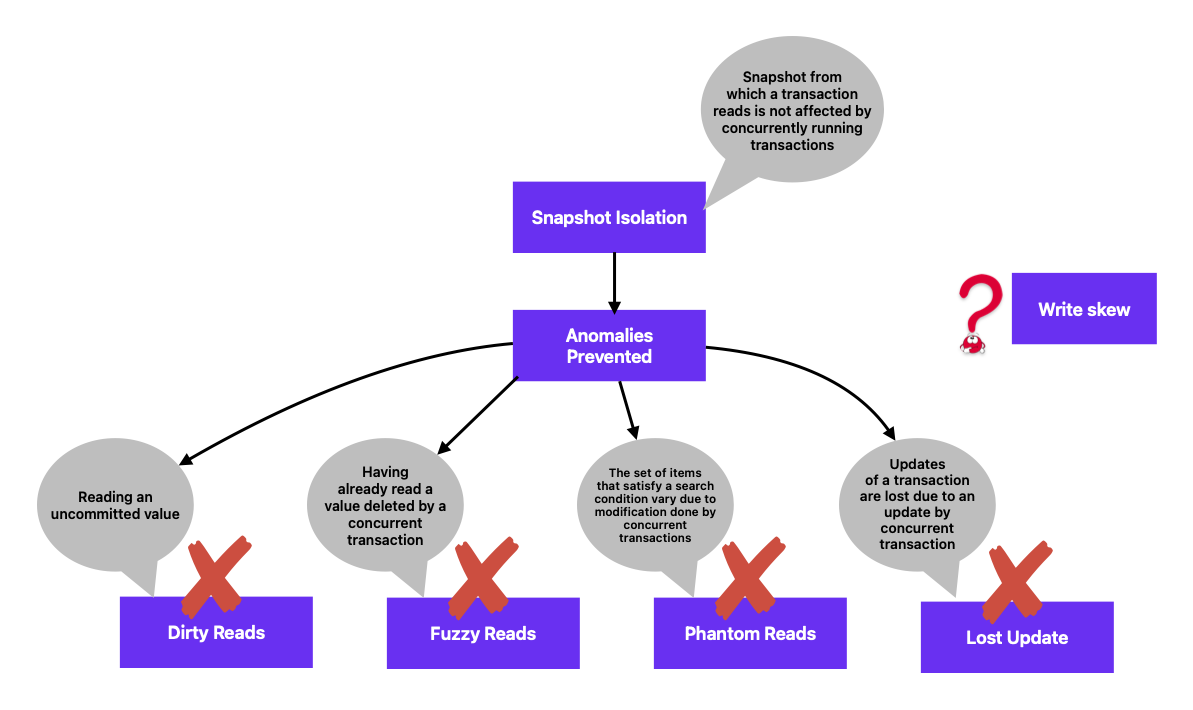
Write skew
Two concurrent transactions can conflict in Snapshot isolation if they write to the same key and there is a temporal overlap. But, what if two transactions write to different keys which are related by some constraint.
Consider the following state in a Key/Value storage engine:
- two keys
xandywith initial values as 1 and related by the constraintx + y > 0. - two concurrent transactions, txn(x) and txn(y), both of which get a
beginTimestampof 1, read the values ofxandyand get 1 as the value for each key. - txn(x) reduces the value of
xby 1 and txn(y) reduces the value ofyby 1.
The following events highlight an anomaly called write skew.
- The transaction txn(x) gets a
commitTimestampof 2, checks thatx + y > 0, reduces the value ofxby 1 and writes the versioned value ofxback to the store. At version 2,xbecomes 0. - The transaction txn(y) gets a
commitTimestampof 3, checks thatx + y > 0, [[it will read the values of x and y using itsbeginTimestamp]] reduces the value ofyby 1 and writes the versioned value ofyback to the store. At version 3,ybecomes 0. - Another readonly transaction txn(another) starts at a later point in time, gets a
beginTimestampof 6 and reads the values ofxandy:- reads the latest value of
xsuch that thecommitTimestampofx<6. It getsx = 0. [xbecame 0 at version 2] - reads the latest value of
ysuch that thecommitTimestampofy<6. It getsy = 0. [ybecame 0 at version 3]
- reads the latest value of
The constraint x + y > 0 is broken. Snapshot isolation does not prevent write skew.
Storage systems like Percolator, Dgraph implement Snapshot isolation.
Let’s now move onto Serializable Snapshot isolation, which prevents write-skew.
Understanding Serializable Snapshot isolation
Serializable Snapshot isolation derives the ideas of beginTimestamp, commitTimestamp and Oracle from Snapshot isolation. The difference is the
way conflict is detected between two concurrently running transactions.
A transaction txn(j) conflicts with another transaction txn(i), if:
- txn(j) writes to the keys read by txn(i), and
- txn(j) commits during the lifetime of txn(i), Tb(txn(i))
<Tc(txn(j)) < Tc(txn(i)).
Here, Tb(txn(i)) represents the beginTimestamp of the transaction txn(i),
Tc(txn(i)) represents the commitTimestamp of the transaction txn(i) and
Tc(txn(j)) represents the commitTimestamp of the transaction txn(j).
Let’s write the pseudo-code for committing a transaction txn(i) with beginTimestamp as Tb.
## detect conflict
for each key in keysRead:
    if lastCommit(key) > txn.beginTimestamp()
	    abort;
    end if;
end for;

## prepare for commit
commitTimestamp <- oracle.commitTimestamp();
for each key in keysToCommit:
   lastCommit(key) <- commitTimestamp
end for;

## apply commits
The pseudo-code checks to see that none of the keys read by the transaction txn(i) have been committed after it began. The implementation of Serializable Snapshot isolation will require each read-write transaction to keep track of the read keys.
BadgerDb implements Serializable Snapshot isolation.
Before diving into the implementation of Serializable Snapshot isolation, let’s quickly take a look at SkipList and MVCC.
SkipList and MVCC
A SkipList is a layered data structure where the lowest layer is an ordinary ordered linked list. Each higher layer acts as an “express lane” for the lists below. Searching proceeds downwards from the top until consecutive elements bracketing the search element are found.
SkipList can be represented with the following structure:
type SkipList struct {
	header *SkiplistNode
	maxLevel  int
}

type SkiplistNode struct {
	key      int
	value    int
	forwards []*SkiplistNode
}
The struct SkipList contains a pointer to a header node and each SkiplistNode contains a key/value pair along with a slice of forward pointers.
The header node is the starting node for all the read/write operations and all the key/value pairs will be added to its right.
One way to ensure that all the key/value pairs are added to the right is to create a header node with some sentinel key/value pair when SkipList is instantiated. If we are creating a SkipList to store positive keys, then the sentinel key in the header node can be -1. Similarly, if we are creating a SkipList to store string keys, then the sentinel value for the key in the header node can be blank.
We are using keys and values of type
intonly to serve as example.
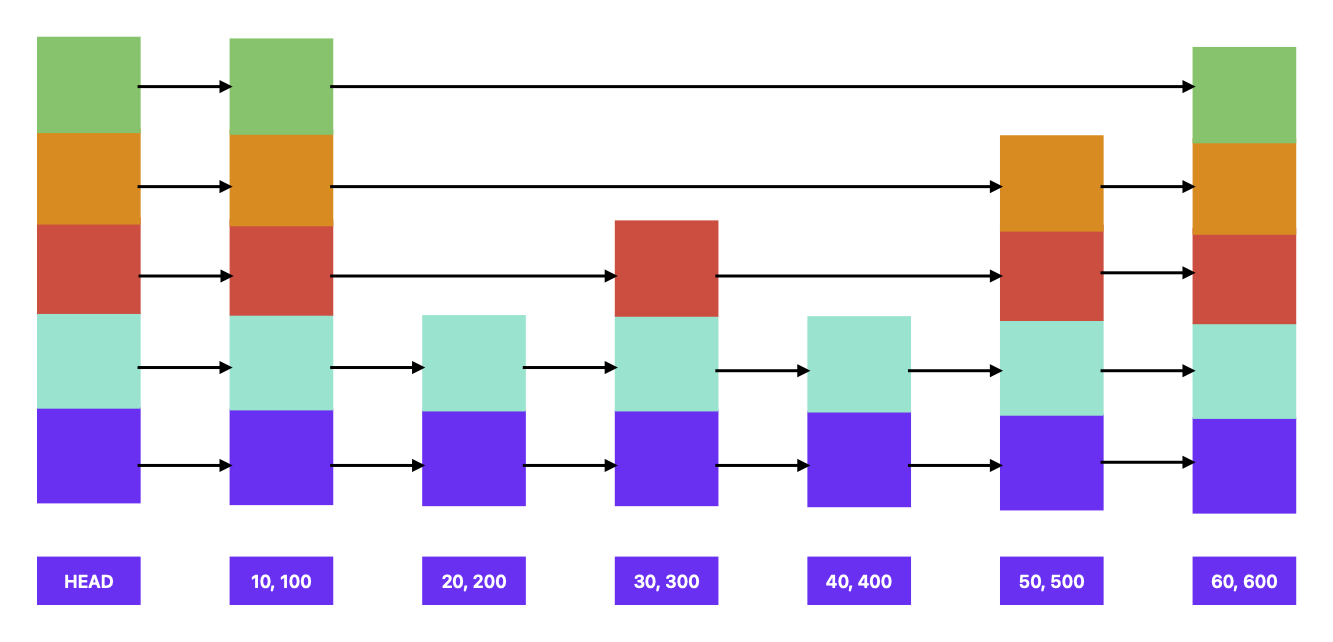
The above image is the representation of our SkipList struct.
(10, 100),(20, 200)represent key,value pairs.
Let’s say we want to search the key 25. The following will be the approach:
- Start with the header node at the highest level and keep moving towards the right until the right key is greater than the search key.
- Right of the header node, at the highest level is 10 which is less than 25, so move right.
- Now we are on the node containing the key 10.
- Right of the node containing key 10 is 60 (at the highest level), which is greater than 25. So move to the lower level on the same node. Keep moving down until the right node contains a key that is less than or equal to the search key.
- We will get down to the level 1 (index starting from 0) on the node containing key 10. Right of this level contains 20, so move right.
- Now we are on the node containing the key 20.
- Right of the node containing key 20 is 30 which is greater than the search key. So move to the lower level on the same node.
- Right of level 0 on the node containing key 20 is still 30. There are no more levels to go down to.
- So, we can conclude that the key 25 is not present in the list.
SkipList is a good data structure in a sense that it allows us to store multiple versions of each key (in a Key/Value storage engine).
Each key is given a version, which is usually the commitTimestamp in Snapshot and Serializable Snapshot isolation.
Each node of SkipList now stores an instance of VersionedKey that can be represented as:
type VersionedKey struct {
	key     []byte
	version uint64
}

func (versionedKey VersionedKey) compare(other VersionedKey) int {
    comparisonResult := bytes.Compare(versionedKey.getKey(), other.getKey())
    if comparisonResult == 0 {
        thisVersion, otherVersion := versionedKey.getVersion(), other.getVersion()
        if thisVersion == otherVersion {
            return 0
        }
        if thisVersion < otherVersion {
            return -1
        }
        return 1
    }
    return comparisonResult
}
The Get method in SkiplistNode takes a VersionedKey, that combines the target key the user wants to search along with the beginTimestamp of the transaction. The method Get
uses the algorithm described earlier. The code is available here
.
We have covered all the building blocks of Serialized Snapshot isolation. It is time to implement it.
Implementing Serializable Snapshot isolation in a Key/Value store
This article describes an implementation of Serialized Snapshot isolation that was implemented with BadgerDb as reference. This implementation focuses specifically on the isolation property of transactions.
Introduction
Let me start by introducing core concepts in the code.
- ReadonlyTransaction: provides support for
Getmethod. AReadonlyTransactionnever aborts. - ReadWriteTransaction: provides support for
PutOrUpdate,GetandCommitmethods. AReadWriteTransactioncan abort if there is a Read-Write conflict with another transaction. - Oracle: awards
beginTimestampandcommitTimestampto transactions. It also checks for conflicts betweenReadWriteTransaction(s). - TransactionExecutor: applies transactions serially, one after the other.
- TransactionTimestampMark: keeps track of the timestamps that are processed. These could be
beginTimestamporcommitTimestamp. - MemTable: an in-memory data structure that uses SkipList for storing versioned keys. It acts as the state machine.
Let’s start by implementing ReadonlyTransaction.
Implementing ReadonlyTransaction
ReadonlyTransaction provides Get method that fetches the value for the given key from the state machine.
Let’s take a look at the definition or ReadonlyTransaction.
type ReadonlyTransaction struct {
	beginTimestamp uint64
	memtable       *mvcc.MemTable
	oracle         *Oracle
}
A ReadonlyTransaction has a beginTimestamp which is obtained from Oracle and an instance of MemTable to fetch the value for a key.
Anytime a new instance of ReadonlyTransaction is created, we get the beginTimestamp from Oracle.
func NewReadonlyTransaction(oracle *Oracle) *ReadonlyTransaction {
  return &ReadonlyTransaction{
    beginTimestamp: oracle.beginTimestamp(),
    oracle:         oracle,
    memtable:       oracle.transactionExecutor.memtable,
  }
}
Let’s take a look the complete implementation of the beginTimetamp method of Oracle.
func (oracle *Oracle) beginTimestamp() uint64 {
	oracle.lock.Lock()
	beginTimestamp := oracle.nextTimestamp - 1
	oracle.beginTimestampMark.Begin(beginTimestamp)
	oracle.lock.Unlock()

	_ = oracle.commitTimestampMark.WaitForMark(context.Background(), beginTimestamp)
	return beginTimestamp
}
The nextTimestamp field of Oracle denotes the commitTimestamp that shall be given to the next ready-to-commit transaction.
Based on the field nextTimestamp, we can derive the beginTimestamp.
- If the
nextTimestampis 10, the next transaction that is ready to commit will be given 10 as itscommitTimestamp. - This means that 9 is the latest timestamp that is given to some transaction txn(some) as its
commitTimestamp. - This means that the current transaction txn(current) can be awarded 9 as its
beginTimestamp. - So,
beginTimestamp = nextTimestamp - 1. - Simply put, txn(current) can read keys with
commitTimestamp< 9, where 9 is thebeginTimestampof txn(current).
If the
nextTimestampis 10, it means that 9 is the latest timestamp that is given to some transaction txn(some) as itscommitTimestamp. Does this mean that the commits with timestamp 9 have been applied to the storage?No, committing a transaction and actually applying its changes to the storage are two distinct events. Committing essentially marks a transaction as ready to be applied, but it doesn’t instantly reflect in the storage. Committed transactions with assigned commitTimestamps form a queue, awaiting their turn to be applied to the storage in a serial manner. This means transactions are processed and reflected in the storage one after another, ensuring orderly updates.
Implementations like BadgerDb wait till all the transactions upto the assigned
beginTimestampare applied.
We will look at the TransactionTimestampMark later, but oracle.commitTimestampMark.WaitForMark(...) waits for all the commits till beginTimetamp to be applied to the state machine.
Is waiting really necessary in getting
beginTimestamp? There are two options:
Wait for a fixed timeout and allow all the commits till
beginTimestampto be applied to the state machine. This may increase the response time for read operations.Do not wait. This may result result in getting an old value for a key. Example, if the
nextTimestampis 10, the current transaction will be awarded 9 as itsbeginTimestamp. However, there might be transactions in the queue waiting to be applied to state machine. This means, reading the value for a key from the state machine will get the value with latest version (/timestamp) which may be less than 9, it could be 6 or could be 5 or anything.
The Get method is fairly simple:
func (transaction *ReadonlyTransaction) Get(key []byte) (mvcc.Value, bool) {
	versionedKey := mvcc.NewVersionedKey(key, transaction.beginTimestamp)
	return transaction.memtable.Get(versionedKey)
}
It involves the following:
- Creating a new instance of
VersionedKeythat consists of the actual key and thebeginTimestampof the transaction. - Reading the value from the
MemTable. This implementation usesSkipListas the in-memory data structure for storing versioned keys, so theGetfromMemTablefollows the algorithm described earlier .
This implementation shows reading the value for a versioned key from an in-memory SkipList. The concept would remain the same even for implementing
a Get in a persistent LSM-tree
based Key/Value storage engine.
Each ReadonlyTransaction will get a beginTimestamp and instead of just reading from an in-memory MemTable, a read will be executed
from an active memtable, inactive memtable(s) and the increasing levels of SSTable.
Implementing ReadWriteTransaction
Let’s look at the definition of ReadWriteTransaction.
type ReadWriteTransaction struct {
	beginTimestamp uint64
	batch          *Batch
	reads          [][]byte
	memtable       *mvcc.MemTable
	oracle         *Oracle
}
A ReadWriteTransaction has a beginTimestamp which is obtained from Oracle and an instance of MemTable to perform read/write from/to.
It also contains a pointer to an instance of Batch which maintains all the key/value pairs that are going to be updated
in one ReadWriteTransaction.
Every ReadWriteTransaction batches the changes and when the changes are ready to be committed, a commitTimestamp is obtained from Oracle
and the changes are applied serially to the state machine.
type Batch struct {
	pairs []KeyValuePair
}
Serializable Snapshot isolation checks for Read-Write conflict as explained earlier
. In order to
facilitate conflict detection, each ReadWriteTransaction also holds a slice (/array, /arraylist) of read keys. The field reads denotes all the
keys read by a ReadWriteTransaction.
BadgerDB uses Serializable Snapshot Isolation for transactions. During a transaction, BadgerDB stores a fingerprint (like a hash) for each key it reads. These fingerprints are 64-bit unsigned integers (uint64). There are two main reasons for using fingerprints instead of the actual keys:
Reduced memory usage: Fingerprints are smaller than the original keys, saving memory within each transaction.
Faster comparisons: Comparing fingerprints (8 bytes) is quicker than comparing entire keys (which can vary in size).
However, there’s a potential downside. Since fingerprints are shorter than keys, it’s possible for two different keys to have the same fingerprint (collisions). This can lead to false conflicts between transactions.
Anytime a new instance of ReadWriteTransaction is created, we get the beginTimestamp from Oracle amd we also create a new instance of Batch.
func NewReadWriteTransaction(oracle *Oracle) *ReadWriteTransaction {
	return &ReadWriteTransaction{
		beginTimestamp: oracle.beginTimestamp(),
		batch:          NewBatch(),
		oracle:         oracle,
		memtable:       oracle.transactionExecutor.memtable,
	}
}
Let’s take a look at the PutOrUpdate method.
PutOrUpdate
The idea is to batch all the distinct key/value pairs and commit them once the Commit method is invoked.
func (transaction *ReadWriteTransaction) PutOrUpdate(key []byte, value []byte) error {
	err := transaction.batch.Add(key, value)
	if err != nil {
		return err
	}
	return nil
}

func (batch *Batch) Add(key, value []byte) error {
  if batch.Contains(key) {
      return errors.DuplicateKeyInBatchErr
  }
  batch.pairs = append(batch.pairs, newKeyValuePair(key, value))
  return nil
}
Commit
Committing a transaction is a bit involved. Let’s understand the steps involved:
- Attempt to generate the
commitTimestampfor the transaction.- Detect conflict with other transactions.
- If there is no conflict, generate the timestamp.
- To detect conflict with other transactions,
Oraclemust keep a track of all the ready-to-commit transactions and clean it up in time.
- Convert the transaction’s
BatchtoTimestampedBatchTimestampedBatchcontains all the keys of theBatchwith thecommitTimestampas the version
- Apply
TimestampedBatchserially to the state machine.
Let’s look the Commit method provided by ReadWriteTransaction.
func (transaction *ReadWriteTransaction) Commit() (<-chan struct{}, error) {
	if transaction.batch.IsEmpty() {
		return nil, errors.EmptyTransactionErr
	}

	//get the commitTimestamp, if there is no conflict.
	commitTimestamp, err := transaction.oracle.mayBeCommitTimestampFor(transaction)
	if err != nil {
		return nil, err
	}
	commitCallback := func() {
		transaction.oracle.commitTimestampMark.Finish(commitTimestamp)
	}

	//convert the batch to a timestampedBatch: use commitTimestamp in all the keys of the Batch.
	timestampedBatch := transaction.batch.ToTimestampedBatch(commitTimestamp, commitCallback)

	//apply timestampedBatch serially.
	return transaction.oracle.transactionExecutor.Submit(timestampedBatch), nil
}
The Commit method attempts to generate the commitTimestamp buy invoking the method mayBeCommitTimestampFor. Let’s take a look.
func (oracle *Oracle) mayBeCommitTimestampFor(transaction *ReadWriteTransaction) (uint64, error) {
	oracle.lock.Lock()
	defer oracle.lock.Unlock()

	//check for conflict.
	if oracle.hasConflictFor(transaction) {
		return 0, txnErrors.ConflictErr
	}

	oracle.finishBeginTimestampForReadWriteTransaction(transaction)
    //clean up the committedTransactions.
	oracle.cleanupCommittedTransactions()

	//generate next commitTimestamp.
	commitTimestamp := oracle.nextTimestamp
	oracle.nextTimestamp = oracle.nextTimestamp + 1

	//mark the current transaction as ready to commit and track it in the committedTransactions.
	oracle.trackReadyToCommitTransaction(transaction, commitTimestamp)
	oracle.commitTimestampMark.Begin(commitTimestamp)
	return commitTimestamp, nil
}
The idea behind mayBeCommitTimestampFor can be summarized as:
- Detect conflict with other transactions and return an error if there is a conflict.
- Clean up the ready-to-commit state.
- Generate the
commitTimestamp. - Track the current transaction as ready-to-commit.
- Return the
commitTimestamp.
The code for determining conflicts checks to see if there is a read-write conflict between the current transaction and any other ready-to-commit transaction.
func (oracle *Oracle) hasConflictFor(transaction *ReadWriteTransaction) bool {
	//the current transaction is ready to commit, let's call it Tx.
	for _, committedTransaction := range oracle.committedTransactions {
		//ignore the committedTransaction if its commitTimestamp <= Tx's beginTimestamp.
		if committedTransaction.commitTimestamp <= transaction.beginTimestamp {
			continue
		}

		//if the commitTimestamp of any transaction Ty > Tx's beginTimestamp, and
		//the transaction Ty contains any of the keys read by the Tx, then abort Tx.
		for _, key := range transaction.reads {
			if committedTransaction.transaction.batch.Contains(key) {
				return true
			}
		}
	}
	return false
}
Oracle can not store infinite number of ready-to-commit transactions in RAM, so the state needs to be cleared. It is safe to clean up all the
ready-to-commit transactions which have a commitTimestamp that is less than or equal to the maximum beginTimestamp of any transaction.
TransactionTimestampMark
helps in identifying the maxBeginTransactionTimestamp.
func (oracle *Oracle) cleanupCommittedTransactions() {
	updatedCommittedTransactions := oracle.committedTransactions[:0]
	maxBeginTransactionTimestamp := oracle.beginTimestampMark.DoneTill()

	//clean up the committedTransactions:
	//remove all the committedTransactions with commitTimestamp <= maxBeginTransactionTimestamp.
	for _, transaction := range oracle.committedTransactions {
		if transaction.commitTimestamp <= maxBeginTransactionTimestamp {
			continue
		}
		updatedCommittedTransactions = append(updatedCommittedTransactions, transaction)
	}
	oracle.committedTransactions = updatedCommittedTransactions
}
Oracle only tracks ReadWriteTransactions. ReadonlyTransactions never abort and never participate in conflict detection.
Let’s now take a look the Get method of ReadWriteTransaction.
Get
The Get method tries to get the value of the key from Batch, and if the value is not found, it uses MemTable to get the value.
Tracking the read keys is an important step involved in the Get method.
func (transaction *ReadWriteTransaction) Get(key []byte) (mvcc.Value, bool) {
    if value, ok := transaction.batch.Get(key); ok {
        return mvcc.NewValue(value), true
    }
    transaction.reads = append(transaction.reads, key)

	versionedKey := mvcc.NewVersionedKey(key, transaction.beginTimestamp)
	return transaction.memtable.Get(versionedKey)
}

func (batch *Batch) Get(key []byte) ([]byte, bool) {
    for _, pair := range batch.pairs {
      if bytes.Compare(pair.key, key) == 0 {
          return pair.value, true
      }
    }
    return nil, false
}
Let’s now understand how transactions are applied to the state machine.
Implementing TransactionExecutor
TransactionExecutor is implemented as single goroutine that accepts TimestampedBatches and applies them serially. It can be considered an
implementation of singular update queue
.
It contains a pointer to MemTable to which the changes the applied and a couple of channels.
type TransactionExecutor struct {
	batchChannel chan TimestampedBatch
	stopChannel  chan struct{}
	memtable     *mvcc.MemTable
}

func NewTransactionExecutor(memtable *mvcc.MemTable) *TransactionExecutor {
	transactionExecutor := &TransactionExecutor{
		batchChannel: make(chan TimestampedBatch),
		stopChannel:  make(chan struct{}),
		memtable:     memtable,
	}
	go transactionExecutor.spin()
	return transactionExecutor
}
Anytime a transaction is ready to commit, its Batch is converted to TimestampedBatch and submitted to TransactionExecutor, which reads
batches from the batchChannel and applies all the key/value pairs present in each batch to the MemTable.
func (executor *TransactionExecutor) Submit(batch TimestampedBatch) <-chan struct{} {
	executor.batchChannel <- batch
	return batch.doneChannel
}

func (executor *TransactionExecutor) spin() {
	for {
		select {
		case timestampedBatch := <-executor.batchChannel:
			executor.apply(timestampedBatch)
			executor.markApplied(timestampedBatch)
		case <-executor.stopChannel:
			close(executor.batchChannel)
			return
		}
	}
}
Why are transactions applied applied using a single goroutine?
In the real world, applying a transaction would mean writing it to WAL and the state machine. If the transactions are not applied by a single goroutine, the system would need locks to prevent concurrent modifications. These locks would block other goroutines because tasks like writing to WAL are time-consuming.
Using an approach like singular update queue also allows transactions to be applied in order.
Implementing TransactionTimestampMark
In order to manage transactions effectively, we need a mechanism to track two indices:
- Latest commit index: This index indicates the point up to which transactions have been successfully applied. It is useful for functions like Oracle.beginTimestamp .
- Latest begin index: This index signifies the
beginTimestampof the most recent transaction. It is helpful for functions like Oracle.cleanupCommittedTransactions .
Such an mechanism is provided by TransactionTimestampMark
.
Each instance of TransactionTimestampMark runs as a goroutine. Oracle maintains two marks:
beginTimestampMarkis used to indicate till what timestamp transactions have begun.commitTimestampMarkis used to indicate till what timestamp transactions have been successfully applied.
type Oracle struct {
	beginTimestampMark    *TransactionTimestampMark
	commitTimestampMark   *TransactionTimestampMark
	//other fields removed
}
Let’s take an example of tracking the beginTimestamp.

- Consider
ReadonlyTransaction(s) Tx, Ty and Tz. Tx and Ty begin at timestamp 20 and Tz begins at timestamp 21. Anytime a transaction begins,beginTimestampMarkis notified. TheTransactionTimestampMarkkeeps a track of all the pending transaction requests by timestamp. After the transactions have begun, the state ofTransactionTimestampMarklooks like the following:
pendingTransactionRequestsByTimestamp => [
    20 : 2,
    21: 1
]
- The transactions Tx and Tx finish. Despite being readonly transactions, every time they finish,
beginTimestampMarkis notified. The state ofTransactionTimestampMarklooks like the following:
pendingTransactionRequestsByTimestamp => [
    20 : 1,
    21: 0
]
Even though there is no transaction at the beginIndex of 21, we can not return 21 as the Latest begin index because there is a transaction
which is yet to finish at the index 20. Effectively, TransactionTimestampMark
maintains a binary heap
to keep track of all indices.
- The readonly transaction Ty finishes. The state of
TransactionTimestampMarklooks like the following:
pendingTransactionRequestsByTimestamp => [
    20 : 0,
    21: 0
]
At this stage, TransactionTimestampMark can return 21 as the Latest begin index and Oracle can then clean up the committed transactions
based on this information.
In conclusion, Serializable Snapshot isolation combines Snapshot isolation and serial execution of transactions. We have all the pieces which can be combined to get a fully functional implementation of Serializable Snapshot isolation. The code is available here .
Mentions
- Google Bard helped with the article.