Testing Serverless Journey
Background by Paul Van Cotthem on Unsplash
Table of contents
It is time to test our Serverless journey which started with a web application that involved an AWS lambda, an API Gateway and DynamoDB.
We had some unit tests for our controller, service and request objects. But, these tests don’t give us the kind of confidence we need to deploy our application. At this stage we don’t even know if the query that is written in the repository is going to work properly or not, forget about releasing the application.
What we need is an ability to test the following:
- Repository works as expected by connecting to DynamoD
- Lambda handler is able to receive an event from the API Gateway and get an order by its id
In simple terms we need some form of integration testing.
Let’s welcome LocalStack
LocalStack is a fully functional local AWS cloud stack. Its github page states the following -
LocalStack provides an easy-to-use test/mocking framework for developing Cloud applications. Currently, the focus is primarily on supporting the AWS cloud stack.
LocalStack spins up various Cloud APIs on local machine including S3, Lambda, DynamoDB and API Gateway. This is all we need to test our complete application.
Some of you might be having a question “Why is S3 needed?”. Well, we will get the answer to this by the end of this article. So, please hold on.
Understanding LocalStack
LocalStack can be made to run as a docker container on a host machine. It supports quite a number of AWS services which will run inside the docker container with different ports exposed on host machine.
Before moving on let’s look at this conversation to understand how can LocalStack be leveraged for testing Serverless application.
Let’s take some small steps to test our application using LocalStack.
Writing Repository Test
In order to test repository layer we need to:
- Build the project
- Have a docker container with a running DynamoDB service
- Facilitate creation of the
orderstable in DynamoDB service - Change the application to connect to the local DynamoDB service
- Add integration tests for the repository
Let’s handle each of them one by one.
Step 1: Build the project
Let’s add a build task to our outer package.json that will execute tsc. Let’s also add the type definition for node by executing npm i @types/node. Here, is how our build script looks like:
"scripts": {
  "test": "jest test/**",
  "build": "tsc"
}
Before we execute our build command, let’s exclude infra and test folders from our outer tsconfig.json.
{
  "compilerOptions": {
    "noEmitOnError": true,
    "moduleResolution": "node",
    "module": "commonjs",
    "target": "es6",
    "outDir": "dist",
    "inlineSourceMap": true
  },
  "exclude": ["infra", "test"]
}
Now, we can execute npm run build that should produce a dist folder with the compiled code.
Note we are using tsc to transpile our typescript code to javascript. We do not have any external dependencies to be packed with our distribution, had there been any we would have gone ahead with webpack.
Step 2: Docker container with a running DynamoDB service
Let’s create a docker-compose.yml file referring to the LocalStack image and start the container as a pretest step in our package.json.
version: "2.1"
services:
  localstack:
    image: localstack/localstack:0.10.7 ## use localstack image
    ports:
      - "4567-4599:4567-4599"
      - "${PORT_WEB_UI-8080}:${PORT_WEB_UI-8080}"
    environment:
      - SERVICES=${SERVICES- }
      - DEBUG=1
      - DATA_DIR=${DATA_DIR- }
      - PORT_WEB_UI=${PORT_WEB_UI- }
      - LAMBDA_EXECUTOR=${LAMBDA_EXECUTOR- }
    volumes:
- "/var/run/docker.sock:/var/run/docker.sock""scripts": {
"pretest": "docker-compose -f test/docker-compose.yml up -d", //start docker compose before running the tests
"test": "jest test/**",
"build": "tsc"
}Run the pretest command and confirm that the LocalStack is running as docker container.
Step 3: Facilitate creation of “orders” table in DynamoDB service
With LocalStack container up and running, the orders table needs to be created in the DynamoDB service. In order to do this we will use the CloudFormation template. So, let’s write one:
AWSTemplateFormatVersion: "2010-09-09"
Resources:
  OrdersTable:
    Type: AWS::DynamoDB::Table
    Properties:
      TableName: "orders" ## create "orders" table
      AttributeDefinitions:
        - AttributeName: "orderId"
          AttributeType: "S" ## use STRING as the data type for "orderId"
      KeySchema:
        - AttributeName: "orderId" ## use "orderId" as the HASH key
          KeyType: "HASH"
We will also create a script to deploy the CloudFormation template against LocalStack. This script will also be executed as a part of our pretest step.
#!/bin/sh

aws cloudformation deploy \
--template-file template.yaml \
--stack-name order-service-stack \
--region us-east-1 \
--capabilities CAPABILITY_IAM  \
--endpoint-url http://localhost:4581

echo 'aws cloudformation deploy executed against localstack'
Few Quick Observations -
- As a part of
aws cloudformation deploy,us-east-1has been specified as the region. By default, LocalStack runs withus-east-1and we are using the same region - As a part of
aws cloudformation deploy, we use 4581 as the port for the local CloudFormation service that is exposed by LocalStack
Let’s update our package.json.
"scripts": {
    "localstack:up": "docker-compose -f test/docker-compose.yml up -d",
    "delay": "sleep 20",
    "localstack:create-infra": "cd test/infra && ./deploy.sh",
    //start docker compose, introduce some delay and run the above script as a part of pretest
    "pretest": "npm run localstack:up && npm run delay && npm run localstack:create-infra",
    "test": "jest test/**",
    "build": "tsc"
}
Following events happens as a part of the pretest step -
- LocalStack docker container start
- Some delay gets introduced to allow localstack services to be available
- CloudFormation template gets deployed against LocalStack by running
deploy.sh
Before the CloudFormation template can be deployed on LocalStack, a small delay has been specified to ensure LocalStack with its services is up and running.
How do I know if the “orders” table was created?
LocalStack tries to replicate the AWS services on local. By this theory, we should be able to run the AWS commands by specifying the endpoint-url of the corresponding service.
> aws dynamodb scan --table-name orders --endpoint-url http://localhost:4569

//Output
{
    "Count": 0,
    "Items": [],
    "ScannedCount": 0,
    "ConsumedCapacity": null
}
Now, the last step is making a change in the application to connect to the local DynamoDB.
Step 4: Connecting the application to the local DynamoDB service
Let’s change the repository layer to connect to the local DynamoDB service.
import {GetItemInput} from "aws-sdk/clients/dynamodb";
import {Order} from "../model/Order";
import {dynamoDbClient} from "../DynamoDbConfiguration";
const dynamoDb = dynamoDbClient(); //get dynamoDbClient from DynamoDbConfiguration
export class OrderRepository {
async findAnOrderBy(id: string) {
const getItemInputOptions: GetItemInput = {
TableName: "orders", //table name
Key: {
"orderId": {S: id} //query against orderId attribute of order item
}
};
const response = await dynamoDb.getItem(getItemInputOptions).promise(); //get a dynamo item by passing its id
return response.Item ? Order.from(response.Item) : null; //map dynamo item to Order
}
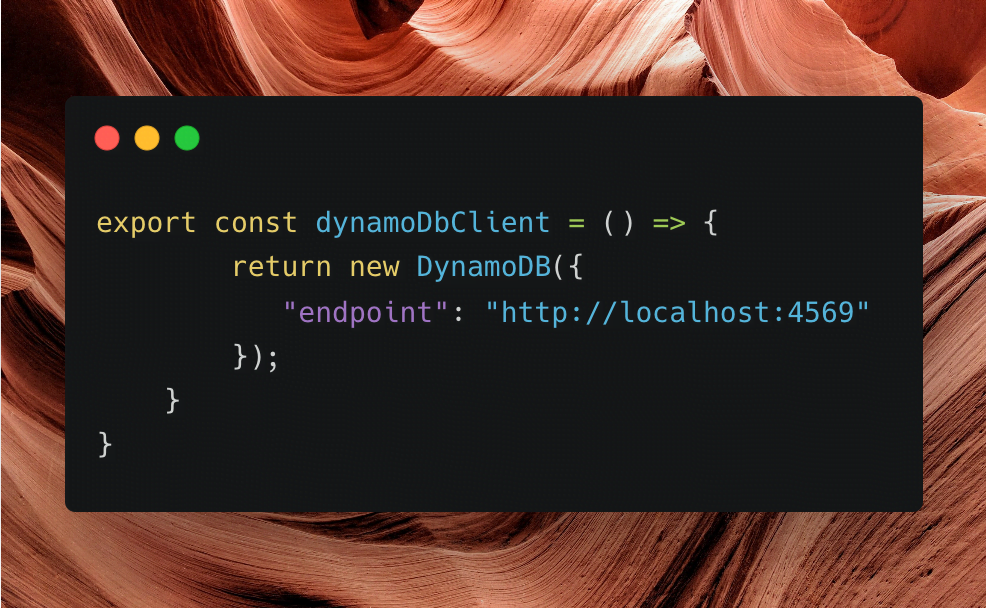
}DynamoDbConfiguration looks like -
import {DynamoDB} from "aws-sdk"

const executionEnvironment = () => {
    const defaultExecutionEnvironment = "test";
    //accept ExecutionEnvironment as the lambda environment variable
    return process.env.ExecutionEnvironment || defaultExecutionEnvironment;
};

const isTestExecutionEnvironment = () => executionEnvironment() === "test";

export const dynamoDbClient = () => {
    if (isTestExecutionEnvironment()) {
        //return an instance of DynamoDB connecting to the local dynamo endpoint exposed by localstack, if the execution environment is "test"
        return new DynamoDB({
            "region": "us-east-1",
            "endpoint": "http://localhost:4569"
        });
    } else {
        //return an instance of DynamoDB connecting to the actual region in AWS
        return new DynamoDB({
            "region": "ap-south-1"
        });
    }
}
Few Quick Observations:
OrderRepositoryusesdynamoDbClientexposed byDynamoDbConfigurationglobally. The reason beingaws-sdkneeds to be initialised during cold startup of the lambda function.DynamoDbConfigurationuses a lambda environment variable to determine if the execution environment is “test”. By default, the execution environment is considered as “test- If the execution environment is “test”, then an instance of DynamoDB connecting to the local dynamo service is returned
- This also means
ExecutionEnvironmentneeds to be passed during deployment as lambda environment variable
- This also means
Step 5: Adding Integration Tests for Repository
import {DeleteItemInput, PutItemInput} from "aws-sdk/clients/dynamodb";

import {OrderRepository} from "../src/repository/OrderRepository";
import {Order}           from "../src/model/Order";
import {dynamoDbClient}  from "../src/DynamoDbConfiguration";

const dynamoDb = dynamoDbClient();

test("should return an order given there is AN order for the provided order id", async () => {
    const orderId = "order-100";

    await OrderRepositoryFixture.deleteAnOrder(orderId); //delete an existing order
    await OrderRepositoryFixture.createAn(new Order(orderId, 5000)); //save an order in dynamo table

    const order = await new OrderRepository().findAnOrderBy(orderId); //find an order by orderId

    expect(order.orderId).toEqual(orderId);
    expect(order.amount).toEqual(5000);
});

test("should NOT return an order given there is NO order for the provided order id", async () => {
    const orderId = "no-order-present-for-this-order-id";
    const order = await new OrderRepository().findAnOrderBy(orderId);

    expect(order).toBeNull();
});

class OrderRepositoryFixture {
    static async createAn(order: Order) {
        const item: PutItemInput = {
            TableName: "orders", //table name
            Item: {
                "orderId": {
                    S: order.orderId //STRING orderId
                },
                "amount": {
                    N: order.amount.toString() //NUMERIC amount
                }
            }
        };
        await dynamoDb.putItem(item).promise(); //save the order
    }
    static async deleteAnOrder(orderId: string) {
        const item: DeleteItemInput = {
            TableName: "orders",
            Key: {
                "orderId": {
                    S: orderId
                }
            }
        };
        await dynamoDb.deleteItem(item).promise(); //delete the order
    }
}
That’s it run all the tests npm t and see them pass 😁
Connecting the dots
We have been able to test our repository against DynamoDB service running in LocalStack. What we want to do next is -
- Deploy lambda function code against lambda function service in LocalStack
- Create REST API backed by lambda function in LocalStack
- Adding integration tests to send a http request against the Api Gateway
Let’s start.
Step 6: Deploy lambda function code
In order to deploy the lambda function code, we need to build the code, archive it, upload the archive on S3 service running inside LocalStack and update the CloudFormation template to create the lambda function by referring to the S3 bucket.
Let’s archive the code, create an S3 bucket and upload the archive on S3 service.
"scripts": {
    "localstack:down": "docker-compose -f test/docker-compose.yml down",
    "localstack:up": "docker-compose -f test/docker-compose.yml up -d",
    "delay": "sleep 20",
    "localstack:create-infra": "cd test/infra && ./init.sh",
    "archive": "cd dist/ && zip -r ../serverless-order-service.zip .",
    "pretest": "npm run build && npm run archive && npm run localstack:down && npm run localstack:up && npm run delay && npm run localstack:create-infra",
    "test": "jest test/**",
    "build": "tsc"
}
The following events happens as a part of pretest step –
- Code gets built using
npm run build - Distribution gets archived using
npm run archive - LocalStack docker container gets stopped using
npm run localstack:down - LocalStack docker container starts using
npm run localstack:up - Some delay gets introduced using
npm run delay - CloudFormation template gets deployed against LocalStack using
npm run localstack:create-infra
package.json now runs build and archive as a part of pretest step. archive simply creates a zip file of the built code which is ready to be uploaded on an S3 bucket. localstack:create-infra now runs init.sh which delegates the job of creating a bucket, uploading the archive and deploying the infra to different scripts (we shall see it soon).
Let’s see the commands to create an S3 bucket and upload the archive. These are the same commands which will be executed from one of our shell scripts:
> aws s3 mb s3://serverless-order-service --endpoint-url http://localhost:4572

> aws s3 cp ../../serverless-order-service.zip \
  s3://serverless-order-service --endpoint-url http://localhost:4572
Let’s update the CloudFormation template to create lambda resource.
AWSTemplateFormatVersion: "2010-09-09"
Resources:
  OrdersFunction:
    Type: AWS::Lambda::Function
    Properties:
      FunctionName: "order-service-function"
      Runtime: "nodejs10.x"
      Handler: "handler.ordersHandler"
      Code:
        S3Bucket: "serverless-order-service"   ## created earlier
        S3Key: "serverless-order-service.zip"  ## uploaded earlier
        Role: !GetAtt "OrdersRole.Arn"         ## refer to a dummy role created below

    OrdersRole:
        Type: AWS::IAM::Role                       ## dummy role
        Properties:
        RoleName: "OrdersFunctionRole"
        AssumeRolePolicyDocument:
          Version: "2012-10-17"
          Statement:
            - Effect: "Allow"
          Action:
            - "sts:AssumeRole"
          Principal:
          Service:
            - "lambda.amazonaws.com"`
Executing npm t should now create AWS lambda function in LocalStack. We can verify the same:
> aws lambda list-functions --endpoint-url http://localhost:4574/

//Output
{
    "FunctionArn": "arn:aws:lambda:us-east-1:000000000000:function:order-service-function",
    "Handler": "handler.ordersHandler",
    "Role": "test_role",
    "Timeout": 3,
    "Runtime": "nodejs10.x"
}
Let’s move on to creating a REST API.
Step 7: Create REST API
This should be simple, let’s update our CloudFormation template to have a REST API with /orders/{instanceId} as the resource and a GET method.
AWSTemplateFormatVersion: "2010-09-09"
Resources:
  ## Content Trimmed

    OrdersApiGateway:
        Type: AWS::ApiGateway::RestApi ## create a REST API
        Properties:
            Name: "orders-api"

    OrdersResource:
    Type: AWS::ApiGateway::Resource ## create an "orders" resource
    Properties:
        ParentId: !GetAtt "OrdersApiGateway.RootResourceId"
        PathPart: "orders"
        RestApiId: !Ref "OrdersApiGateway"

    OrderIdResource:
    Type: AWS::ApiGateway::Resource ## create an "{orderId}" resource
    Properties:
        ParentId: !Ref "OrdersResource"
        PathPart: "{orderId}"
        RestApiId: !Ref "OrdersApiGateway"

    OrdersGetMethod:
    Type: AWS::ApiGateway::Method ## create a "GET" method and integrate with lambda function
    Properties:
        HttpMethod: "GET"
        AuthorizationType: "NONE"
        RestApiId: !Ref "OrdersApiGateway"
        ResourceId: !Ref "OrderIdResource"
        Integration:
        IntegrationHttpMethod: "POST"
        Type: "AWS_PROXY"
        Uri:
            Fn::Join:
            - ""
            - - "arn:"
            - "aws"
            - ":apigateway:"
            - Ref: AWS::Region
            - :lambda:path/2015-03-31/functions/
            - Fn::GetAtt:
                - OrdersFunction
                - Arn
                - /invocations
Executing npm t should now create the REST API in LocalStack. We can verify the same:
> aws apigateway get-rest-apis \
--query "items[?name=='orders-api'].id" \
--output text --region us-east-1 \
--endpoint-url=http://localhost:4567

//Should print Api Id
Step 8: Adding Integration Test for the application
In order to write the integration test we should be sending a http request to an endpoint exposed by the API Gateway inside LocalStack. This endpoint with LocalStack looks like:
http://localhost:4567/restapis/<<REST API Id>>/test/user_request/orders/
This means we need a way to get the REST API id that was created as a part of deployment of CloudFormation template. We will add aws apigateway get-rest-apis command as a part of a script which will be executed from init.sh. This command will write the REST API id into a file that will be read by our integration test.
#!/bin/sh

aws apigateway get-rest-apis \
--query "items[?name=='orders-api'].id" \
--output text --region us-east-1 \
--endpoint-url=http://localhost:4567 > rest_api_id
This is how our init.sh looks now -
#!/bin/sh

./createBucket.sh                       //creates a bucket
./package.sh                            //copies the archive
./deploy.sh                             //deploys the cloudformation
./outputRestApiId.sh                    //logs the REST API id to a file
Now, it is the time to add integration test.
import {OrderRepositoryFixture} from "./fixture/OrderRepositoryFixture";
import {Order} from "../src/model/Order";

import * as fs from "fs";
import * as path from "path";
import Axios from "axios"; //add axios as dev-dependency

let apiId = "";

beforeEach(() => {
    //read REST API id
    apiId = fs.readFileSync(path.resolve("test/infra/rest_api_id"), "utf8").trim();
});

test("should return an order given there is AN order for the provided order id", async () => {

    const orderId = "order-500";

    await OrderRepositoryFixture.deleteAnOrder(orderId); //delete an existing order
    await OrderRepositoryFixture.createAn(new Order(orderId, 4000)); //save an new order

    //make an API call
    const apiUrl = `http://localhost:4567/restapis/${apiId}/test/_user_request_/orders/${orderId}`;
    const response = await Axios.get(apiUrl);

    //assert on the response status and the content
    expect(response.status).toEqual(200);
    expect(response.data).toEqual({
        "orderId": orderId,
        "amount": 4000
    });
}, 20000);
Before the test can be run, we will have to make one change in DynamoDbConfiguration. It returns a dynamoDbClient that connects to the DynamoDB running on localhost:4569. This is not true anymore because the lambda is running inside a docker container and for that lambda function localhost
DynamoDbConfiguration will look like:
import {DynamoDB} from "aws-sdk"

const executionEnvironment = () => {
    const defaultExecutionEnvironment = "local";
    return process.env.ExecutionEnvironment || defaultExecutionEnvironment;
};

const isExecutionEnvironmentLocal = () => executionEnvironment() === "local";

export const dynamoDbClient = () => {
    if (isExecutionEnvironmentLocal()) {
    /** LOCALSTACK_HOSTNAME:
    *     for accessing the hostname from inside the container
    *   localhost:
    *     for running repository integration tests which run on host machine
    **/
        const dynamoHost = process.env.LOCALSTACK_HOSTNAME || "localhost";
        return new DynamoDB({
            "region": "us-east-1",
            "endpoint":`http://${dynamoHost}:4569`
        });
    } else {
        return new DynamoDB({
            "region": "ap-south-1"
        });
    }
};
LocalStack exposes an environment variable LOCALSTACK_HOSTNAME which is available inside the docker process that refers to the host machine.
That’s it run all the tests npm t and see them pass 😁
Summary
We used LocalStack to test our application. Everything is available here.
Here is a quick glimpse of the sequence of events that happen when the integration tests are executed.
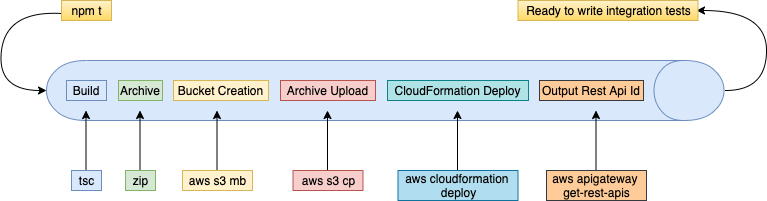
Let’s move on to our last article and see everything in action on an AWS account.